What Is the ‘Too Many Redirects’ Error?
The “too many redirects” error means your website has incorrectly configured redirects that create an infinite loop and prevent the page from loading. Which hurts SEO and the user experience because search engines and users won’t be able to access the page.
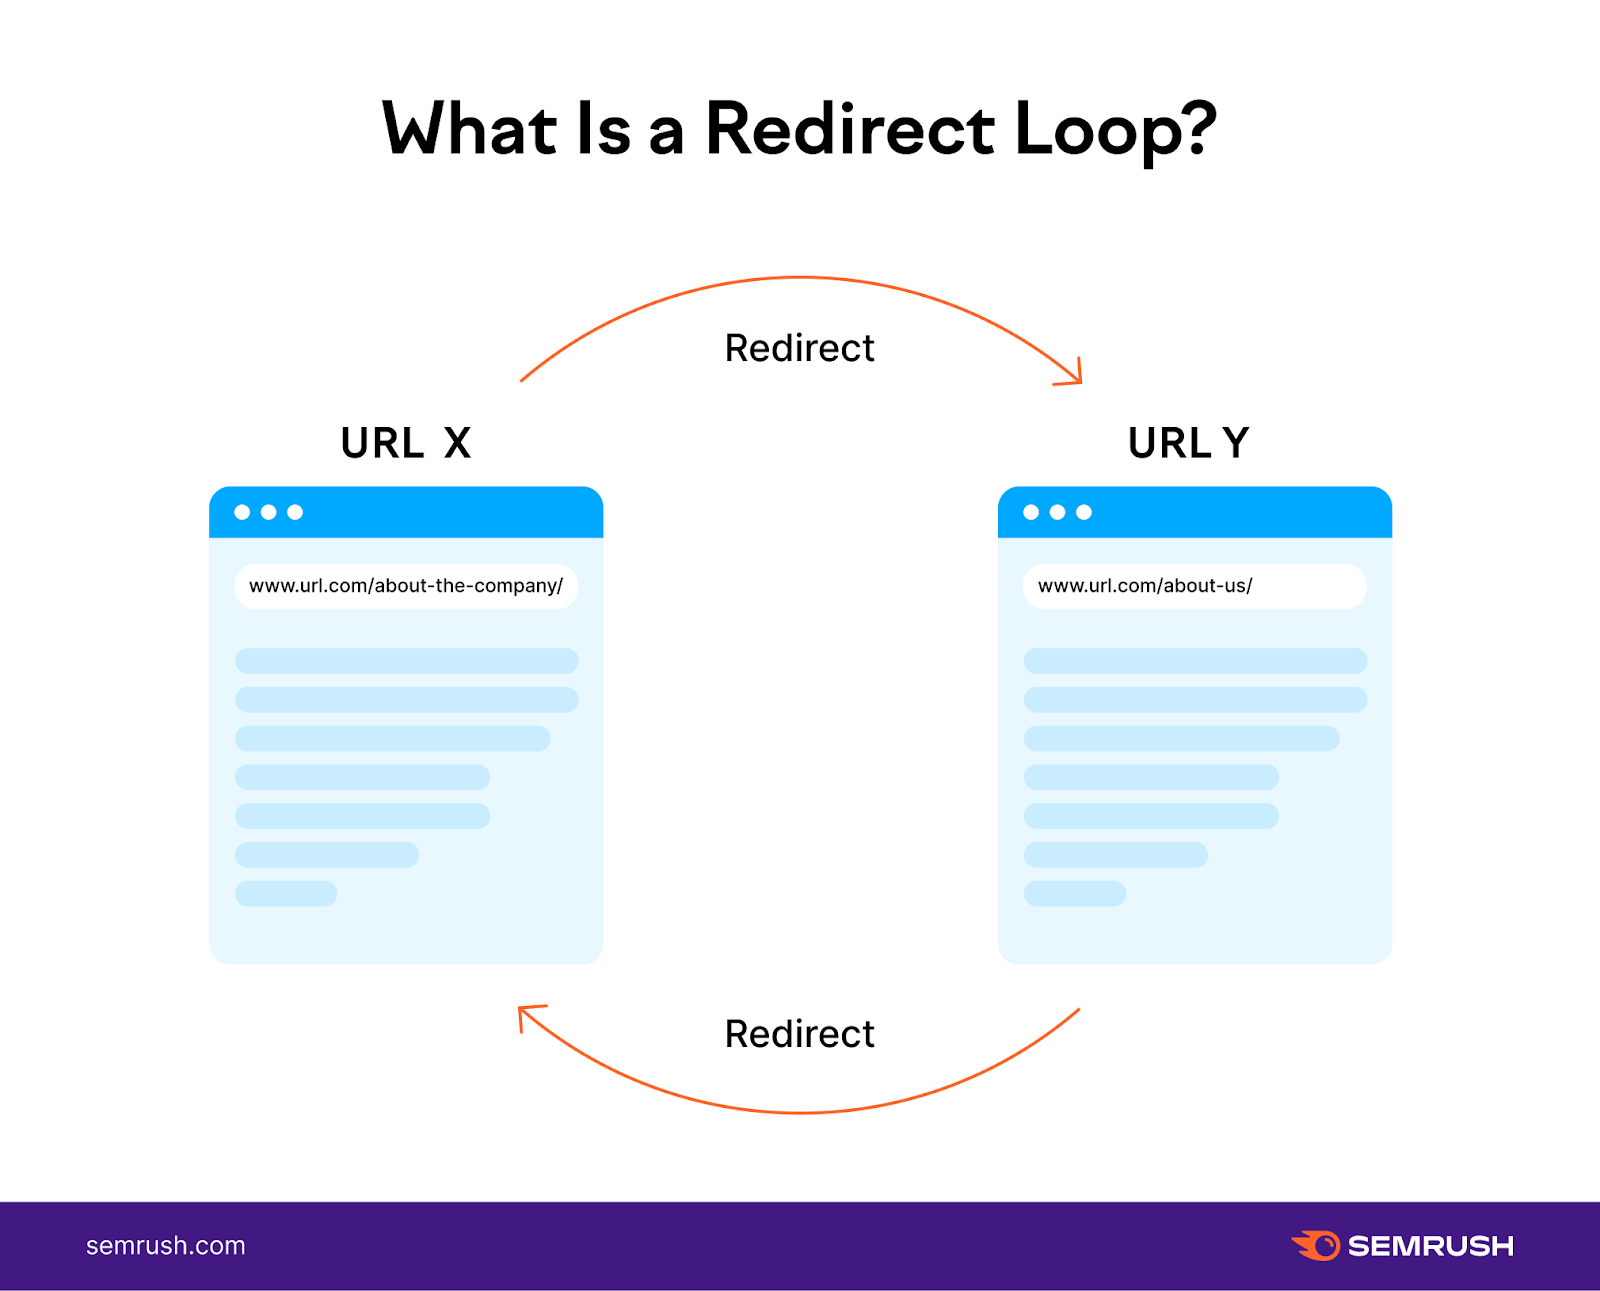
For example, let’s say URL X redirects to URL Y. Then URL Y redirects back to URL X.
That creates a loop. And the browser keeps going back and forth between those two pages until it gives up.
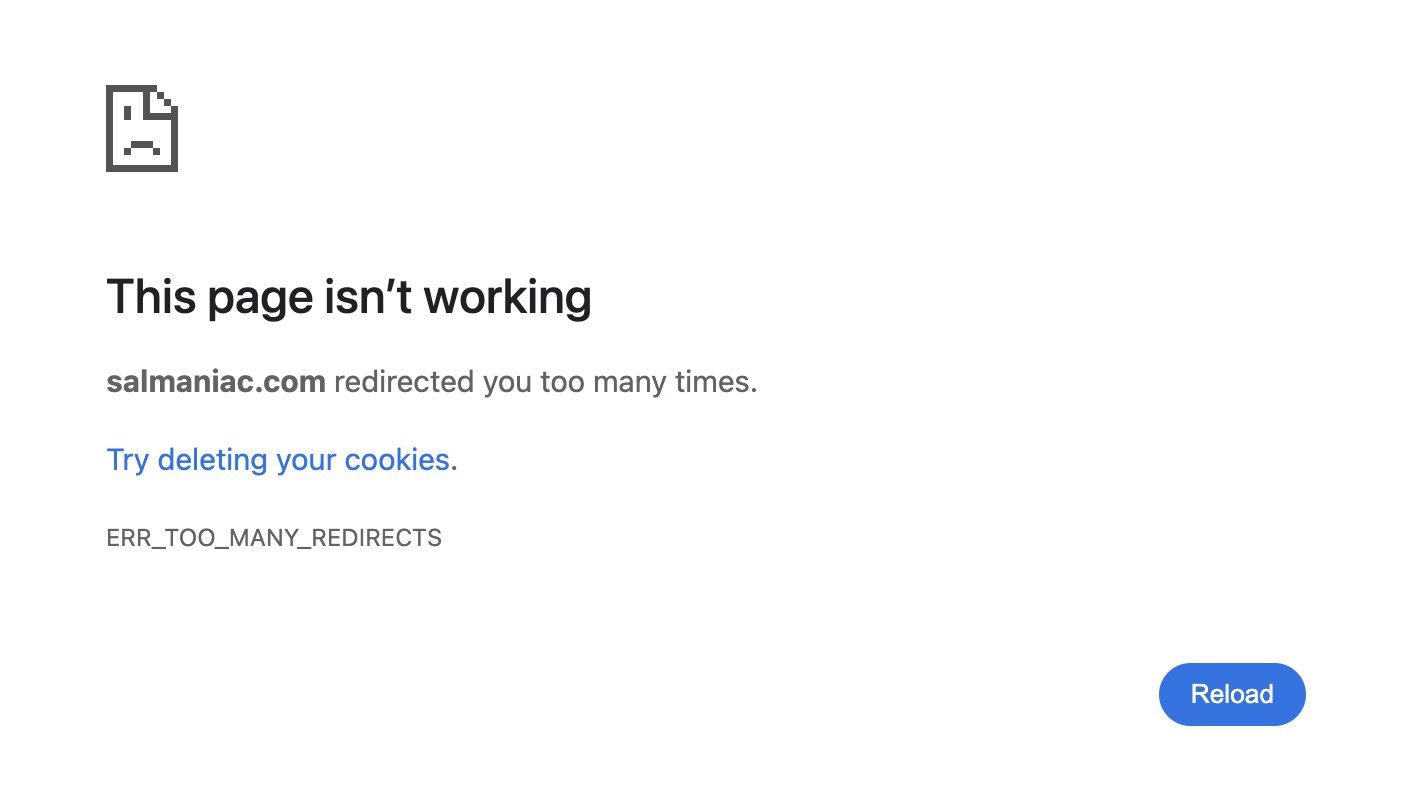
Most browsers will follow up to about 20 redirects. If they can’t reach a final page by then, they stop and show an error instead.
For example, Chrome says this site redirected too many times and suggests clearing cookies.
What Causes the ‘Too Many Redirects’ Error?
The “too many redirects” error is caused by the browser being stuck in a loop that keeps going in circles without reaching a final page.
Dan Taylor, Partner & Head of Technical SEO at SALT.agency, says the most common cause he sees is cookie or cache mismanagement.
"From my experience, it’s usually down to cache or cookie issues—things like session affinity, session control, or incorrect cache control headers. Ten years ago, when HTTPS adoption was more the ‘hype,’ changes in the HTTP/HTTPS protocol caused conflicts, but that’s much less common now."
Here are some other common causes behind redirect loops:
- Outdated server cache: Your server might still be showing an old version of your site that includes broken redirect instructions
- Content delivery network (CDN) cache issues: Your CDN might be serving outdated versions of your site with incorrect redirect rules
- Third-party tools or plugins: If two tools (like a firewall and a plugin) are trying to handle redirects in different ways, they can create a conflict
How to Check Your Website for ‘Too Many Redirects’ Errors
You can check for the ERR_TOO_MANY_REDIRECTS error manually by visiting your site in different browsers.
Dan says his first step is to check redirect rules directly:
“I’ll start by reviewing the .htaccess or server configuration files to make sure there are no conflicting or incorrect redirect rules in place."
He then checks that redirects between HTTP and HTTPS pages and www and non-www pages are set up properly and consistently.
You can crawl your site for redirect issues caused by misconfigured rules with Semrush’s Site Audit tool:
Open the tool and follow the prompts to configure your project.
Once the audit is done, go to the “Issues” tab and search “redirect.”
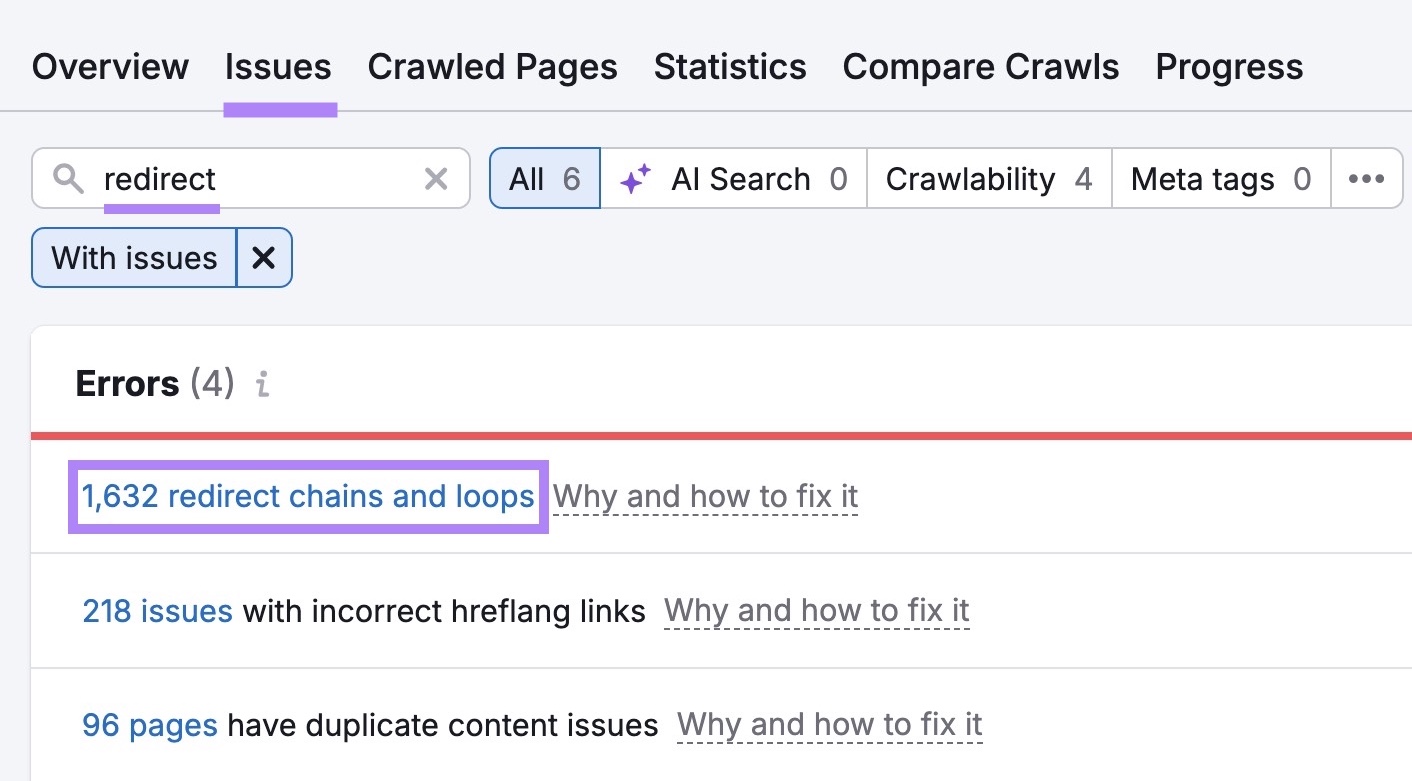
If your website has redirect loops (and/or chains), you’ll see the “# redirect chains and loops” error.
Click on it to see the list of affected URLs.
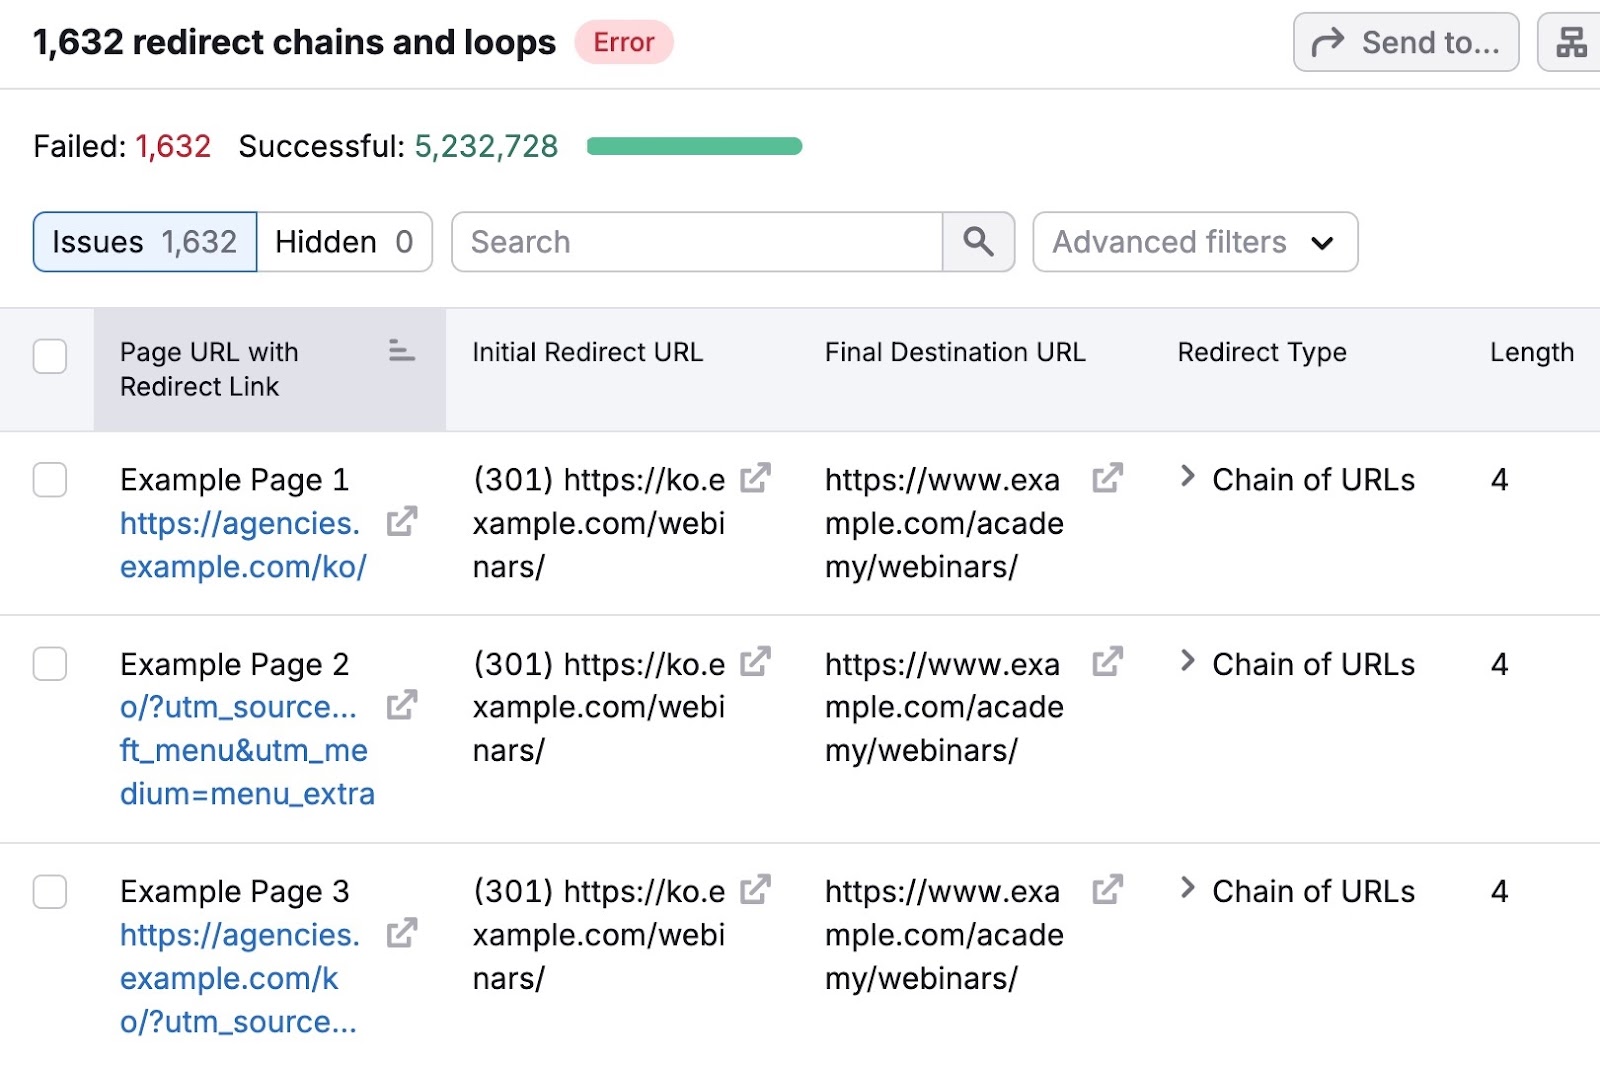
Just know that this specifically uncovers loops resulting from incorrect redirect rules.
Other issues can get in the way as well. So let’s go over how to fix them.
8 Ways to Fix the ‘Too Many Redirects’ Error
1. Clear Browser Cache and Cookies
Clearing your cache and cookies removes outdated data that might be causing your browser to load an old redirect path.
Dan says he always includes this step when debugging redirect loops:
“I’ll clear the cache and cookies in my browser to rule out any stored redirect data that might be causing the loop.”
This is a good place to start if you're seeing the error yourself, but others aren’t. Or if one user reports it, but no one else is affected.
Here are the steps to do this in different browsers:
Google Chrome
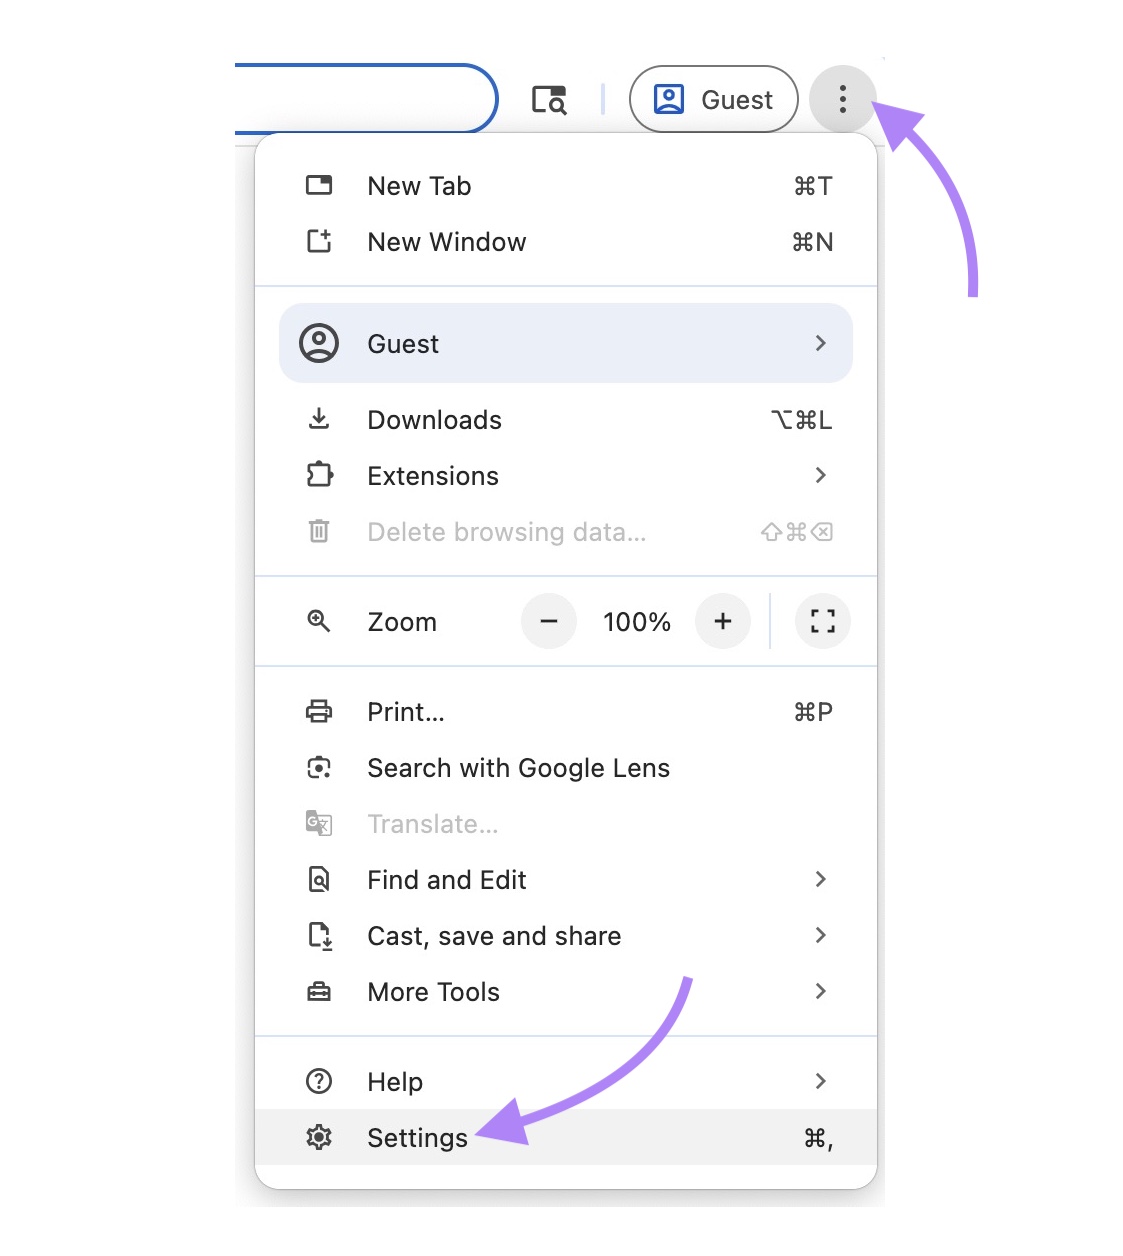
Click the three dots in the top right corner and select "Settings."
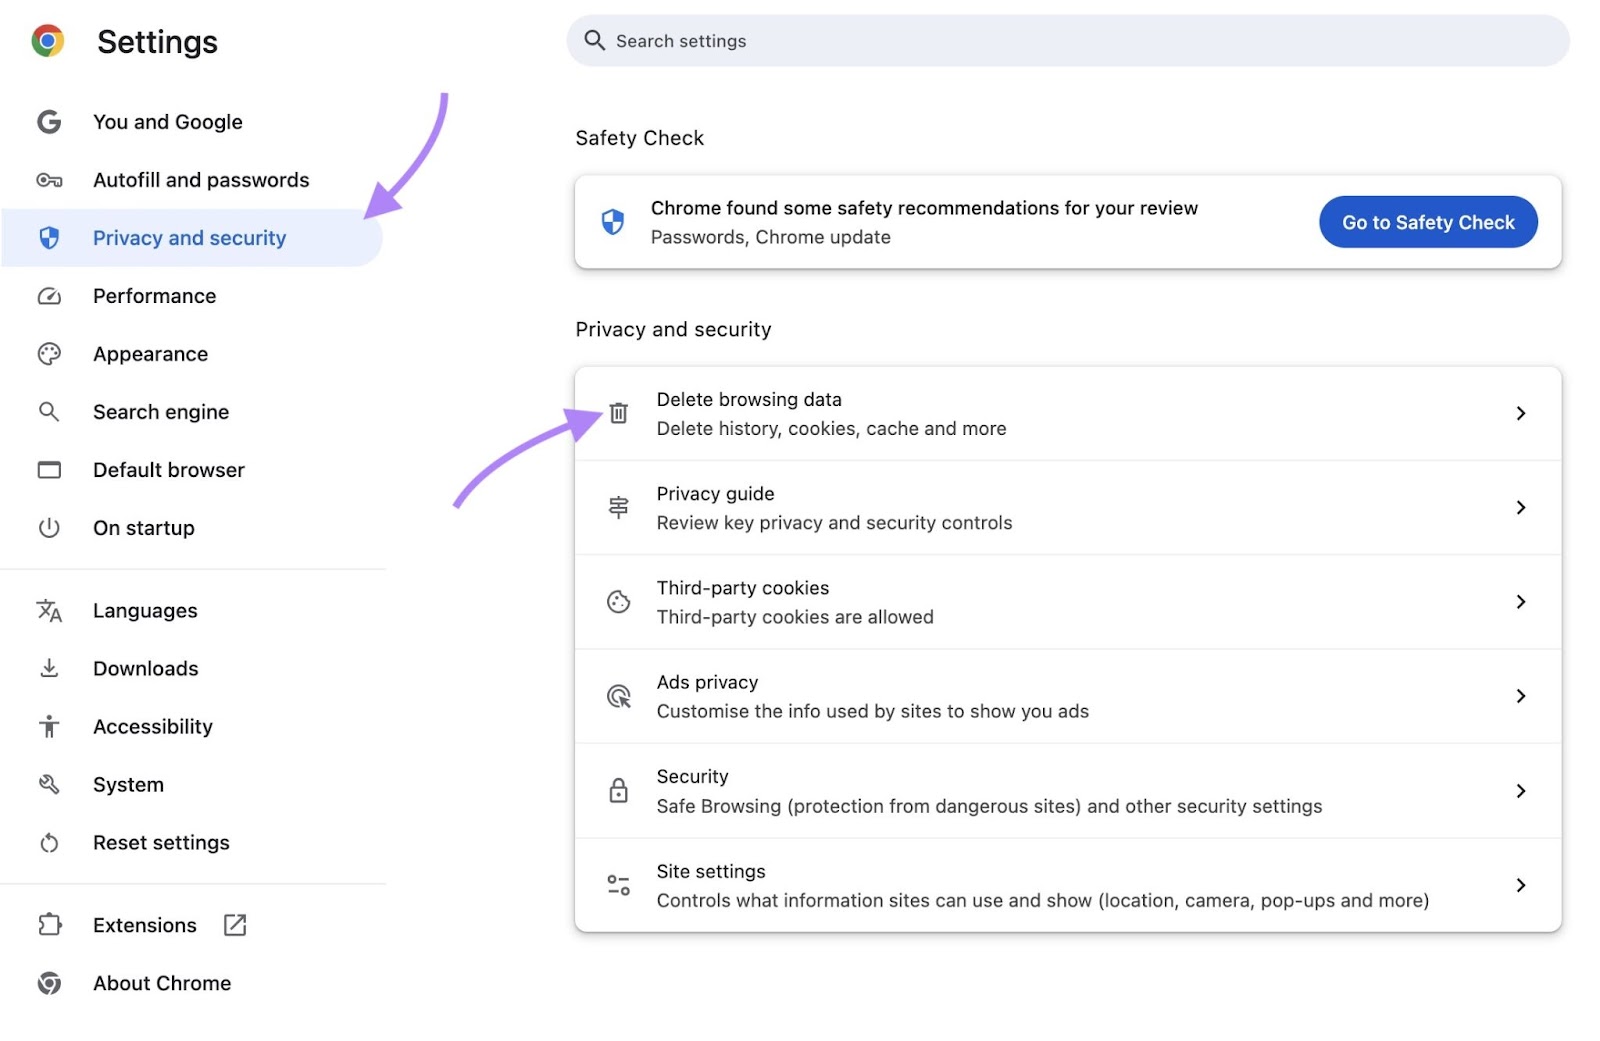
Navigate to "Privacy and security" and click "Delete browsing data."
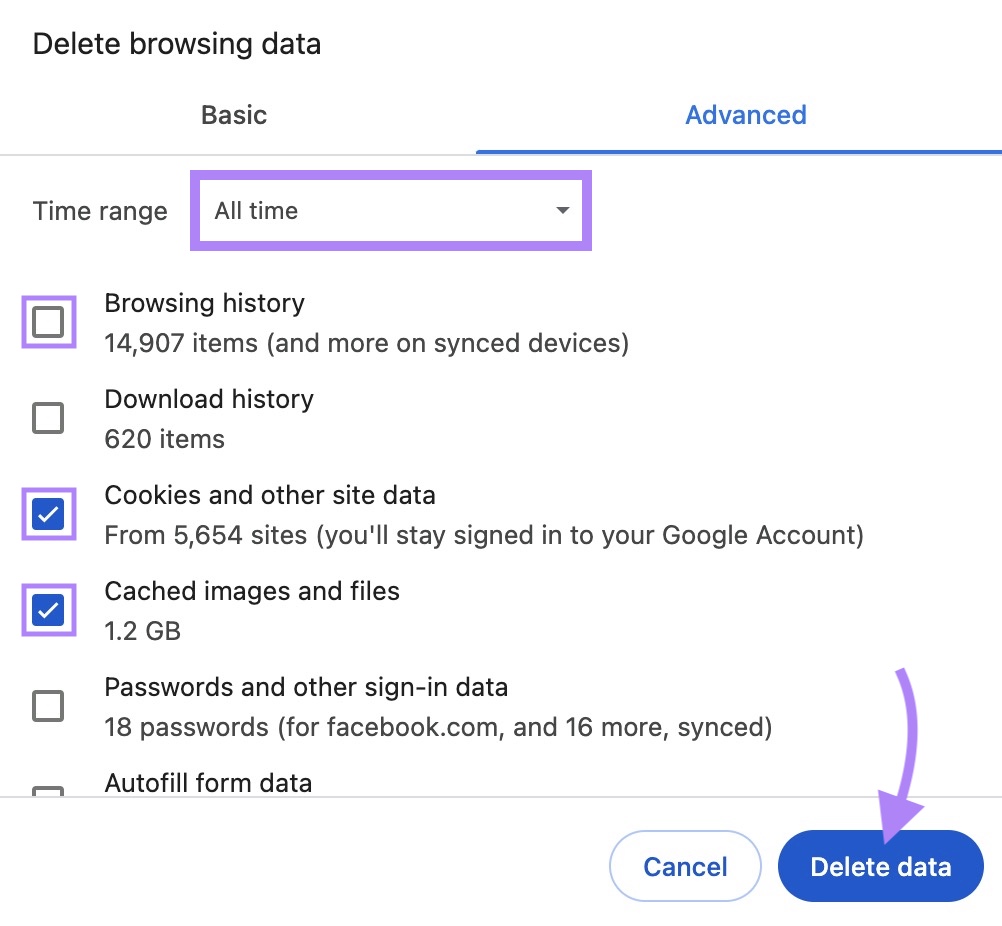
Select both the checkboxes next to "Cookies and other site data" and "Cached images and files." You can uncheck the box next to “Browsing history.”
Set the time range to “All time.” And click “Delete data.”
Firefox
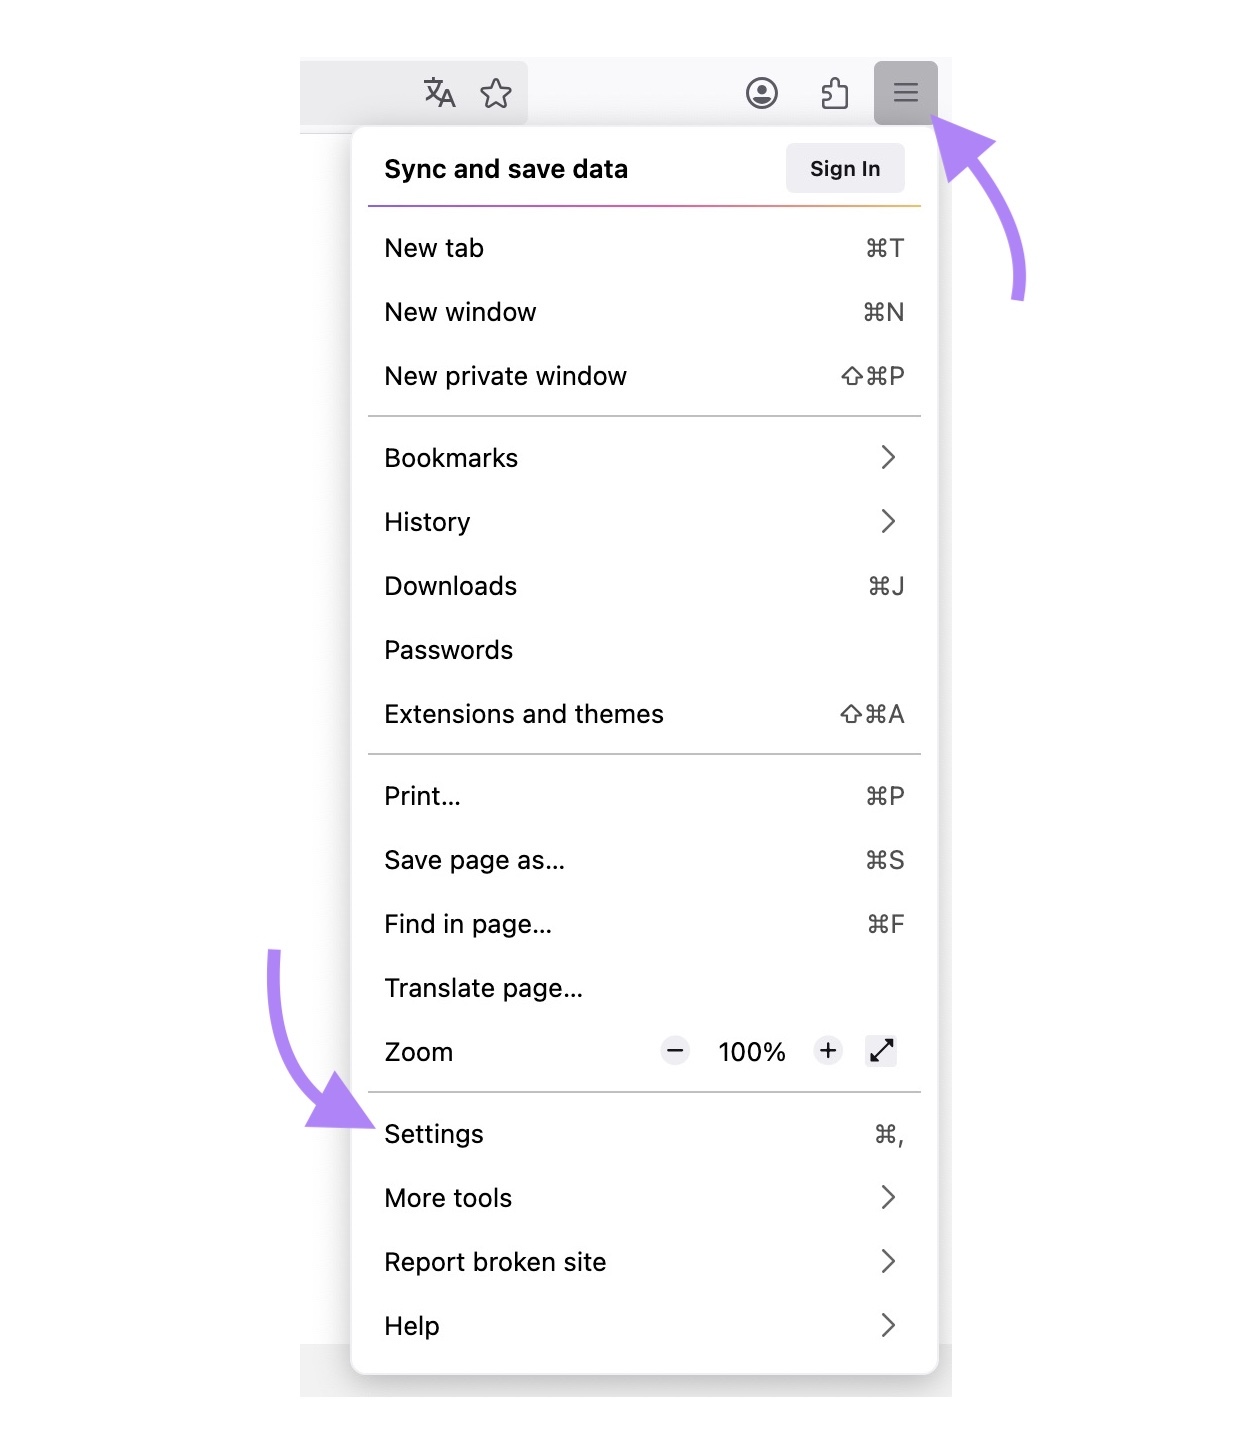
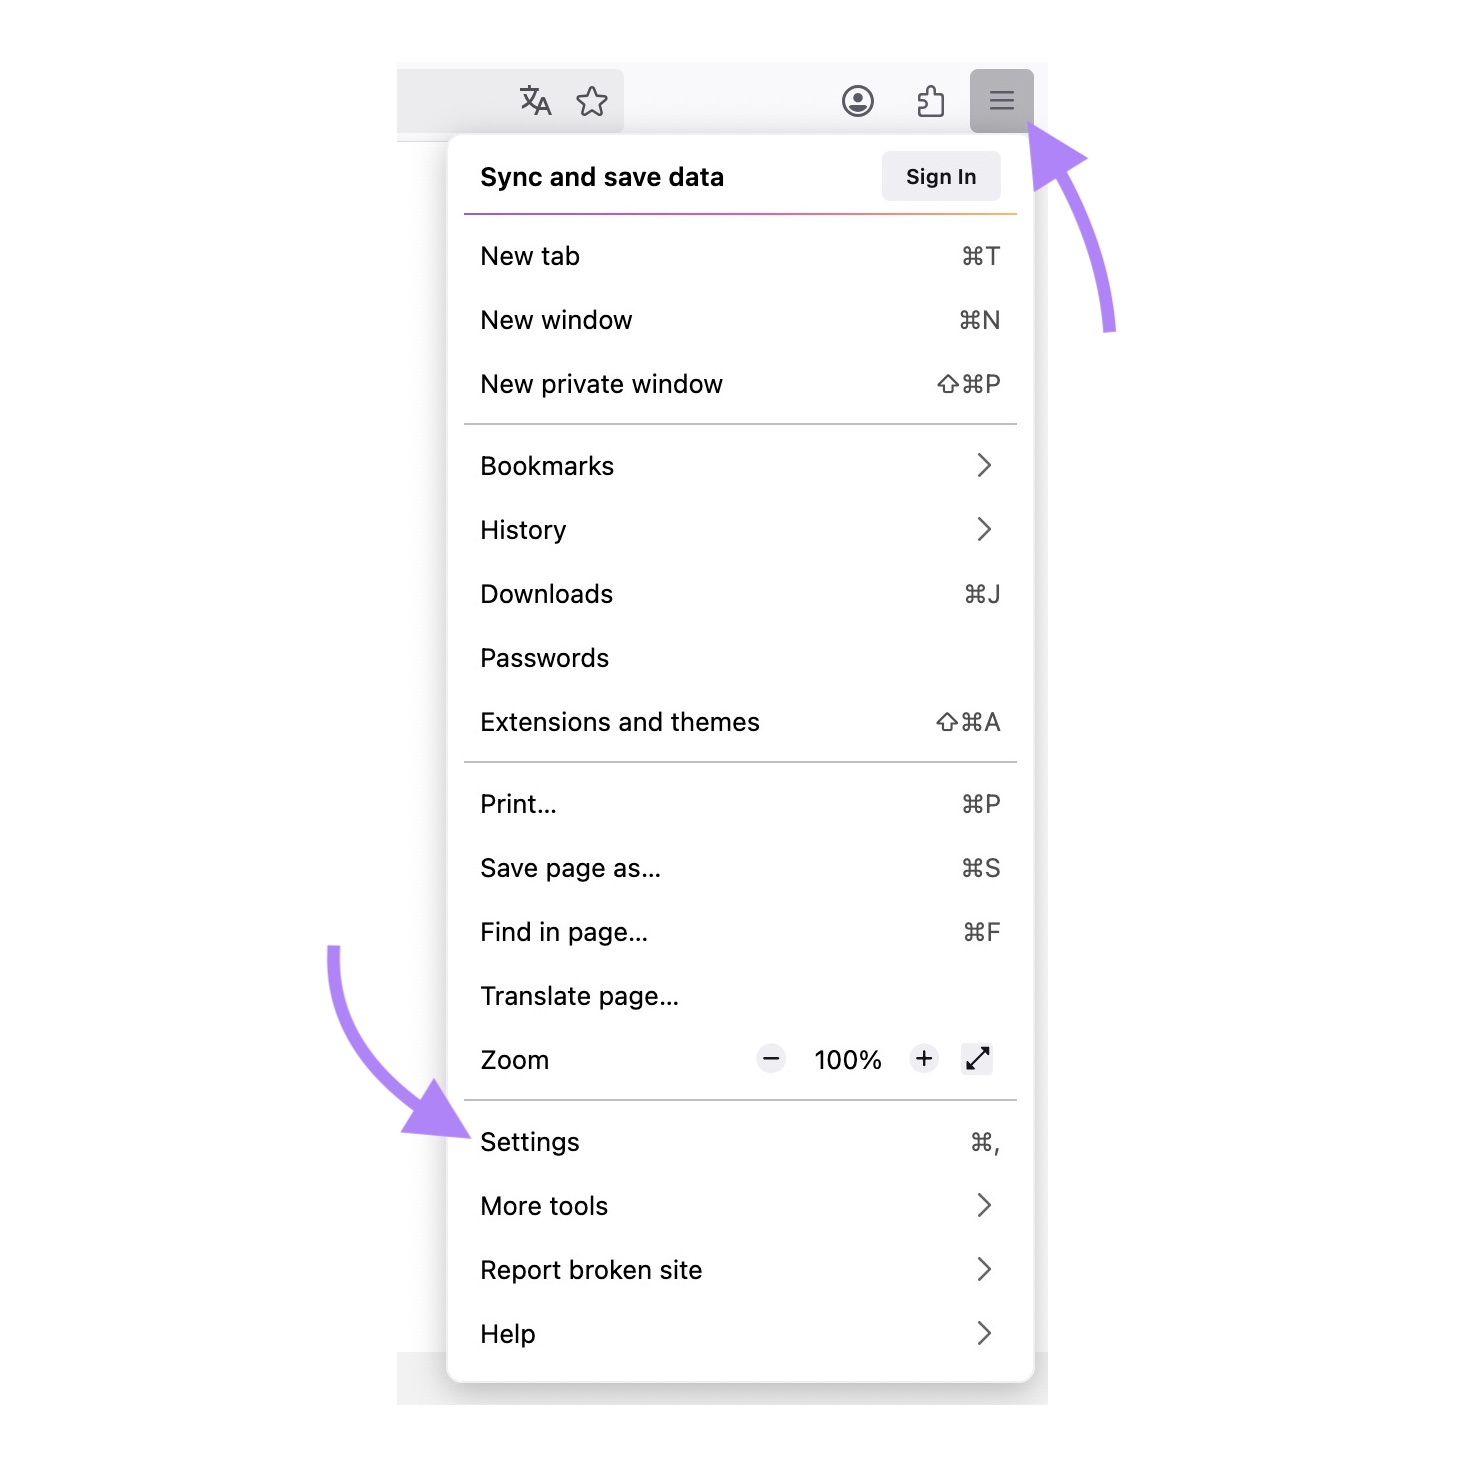
Click the menu button (three lines) in the top right and select "Settings."
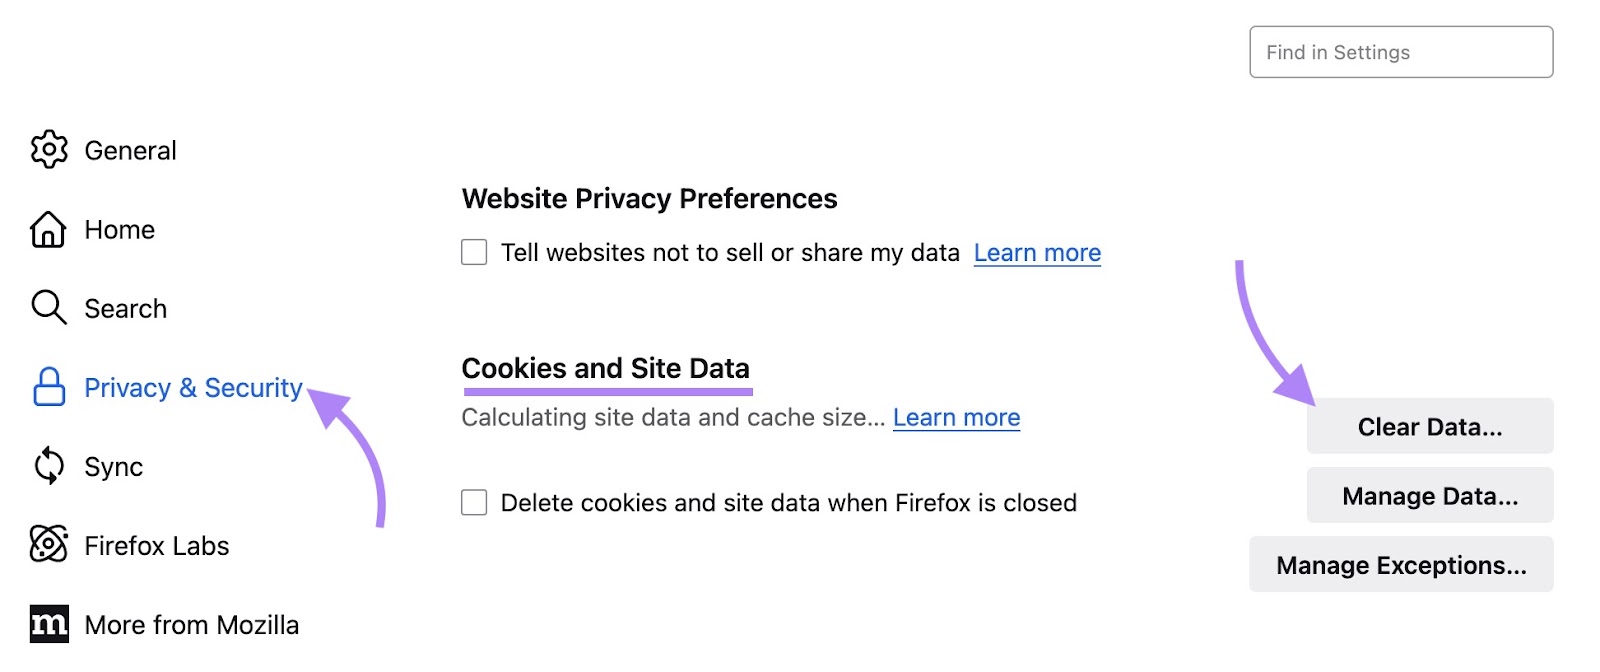
Go to "Privacy & Security," scroll to the "Cookies and Site Data" section, and click "Clear Data…"
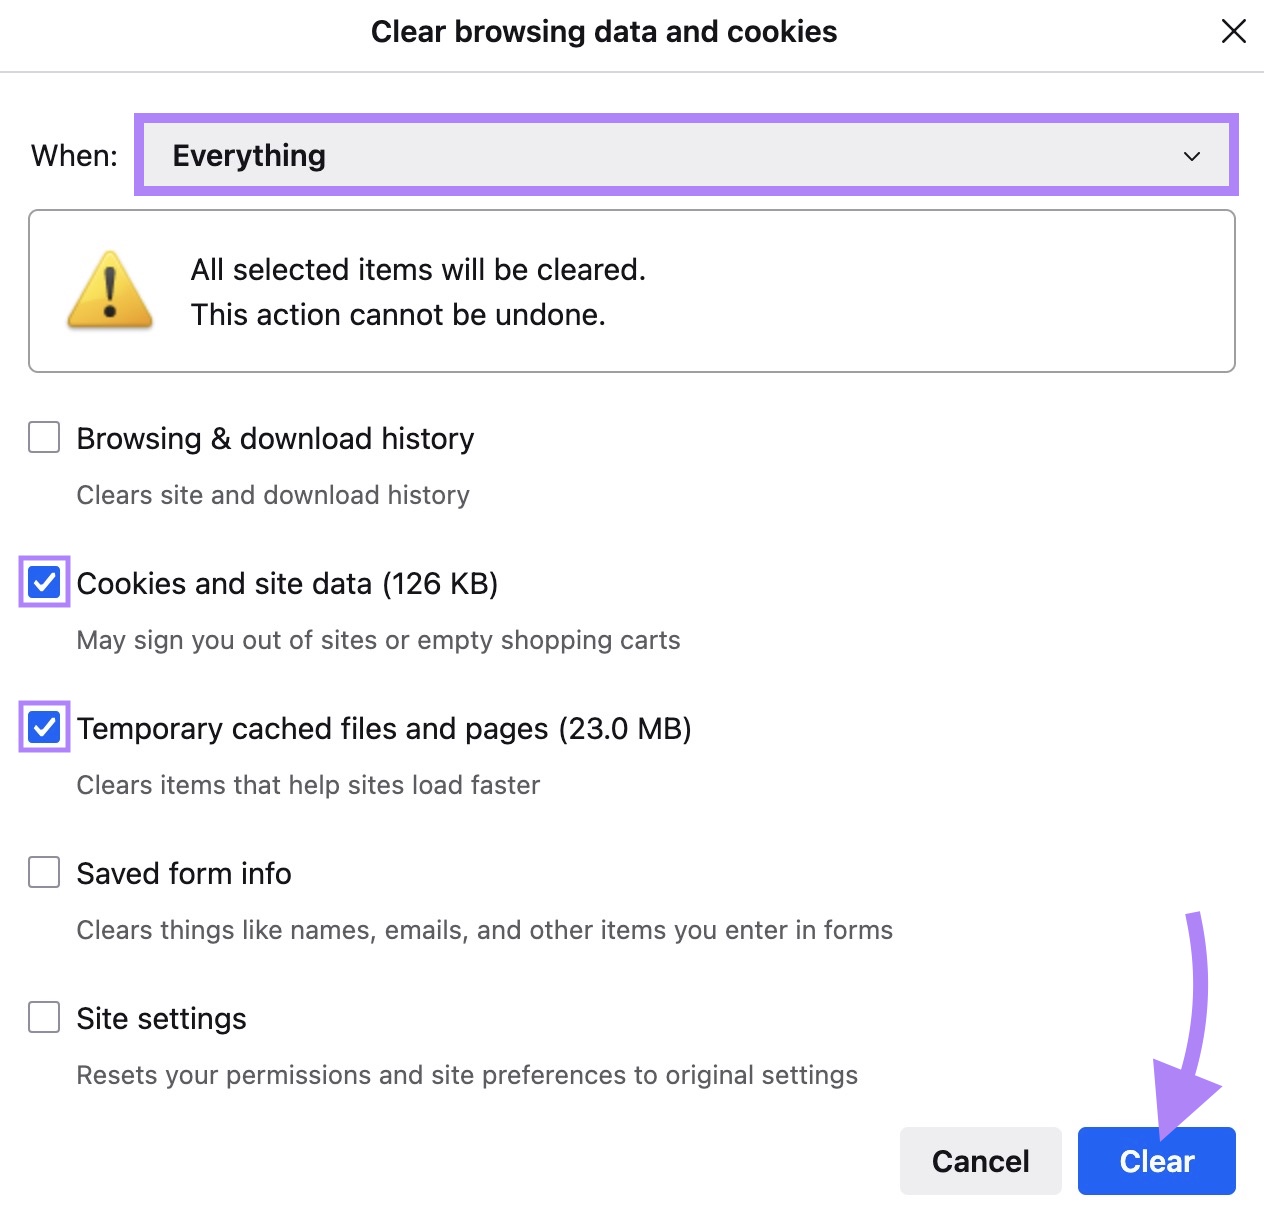
Select the checkboxes next to "Cookies and site data" and "Temporary cached files and pages." You can leave other options unchecked.
Choose “Everything” as the timeframe. Then click "Clear."
Safari
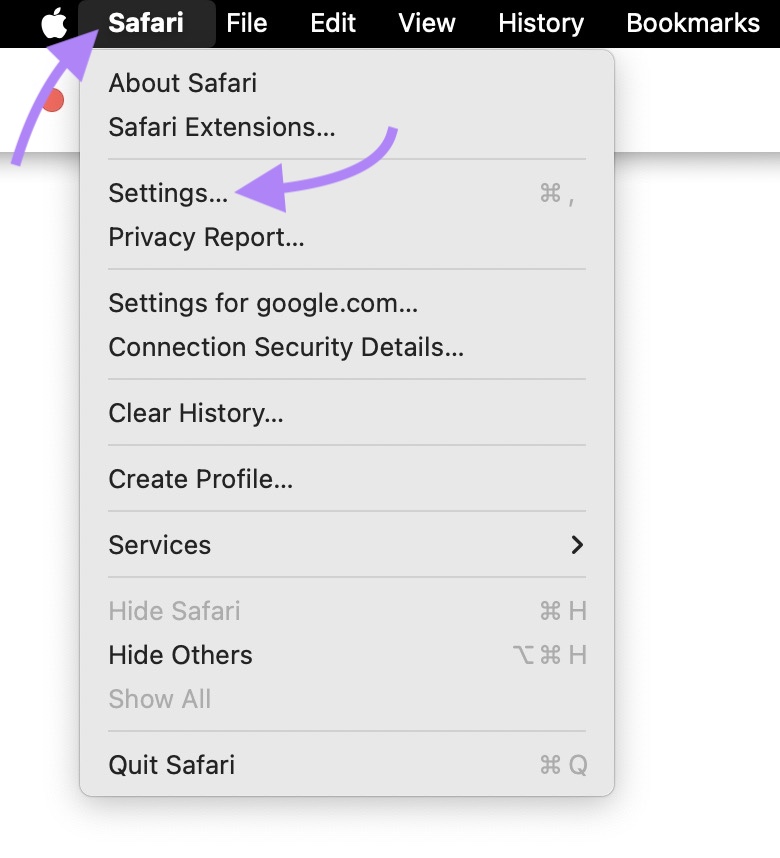
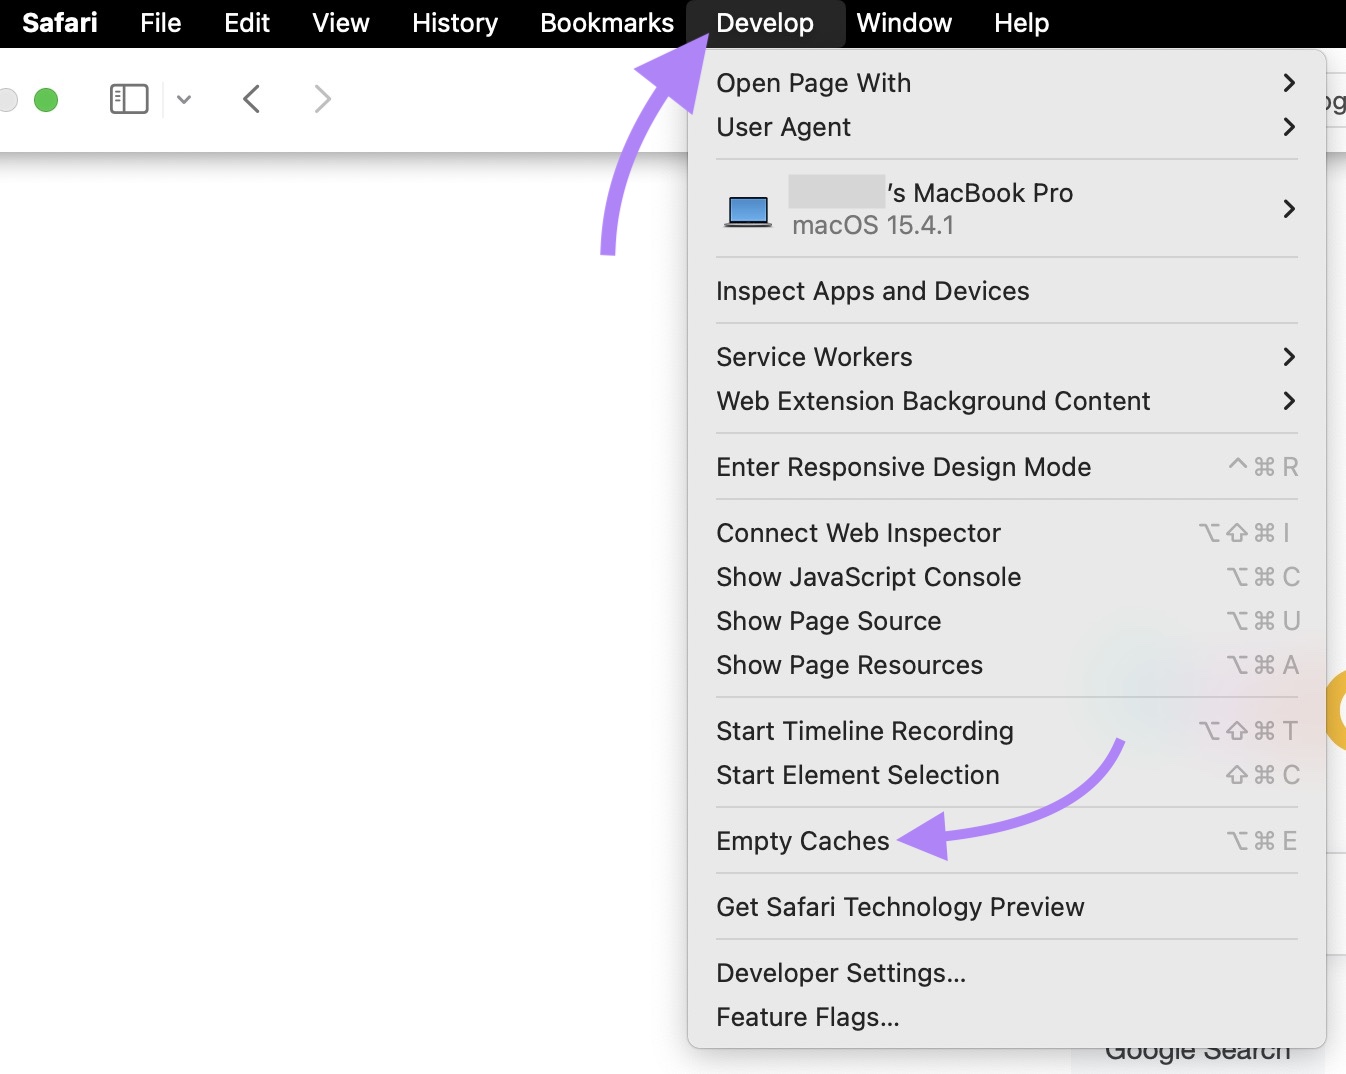
Click the “Safari” tab in the top menu, then select “Settings…”
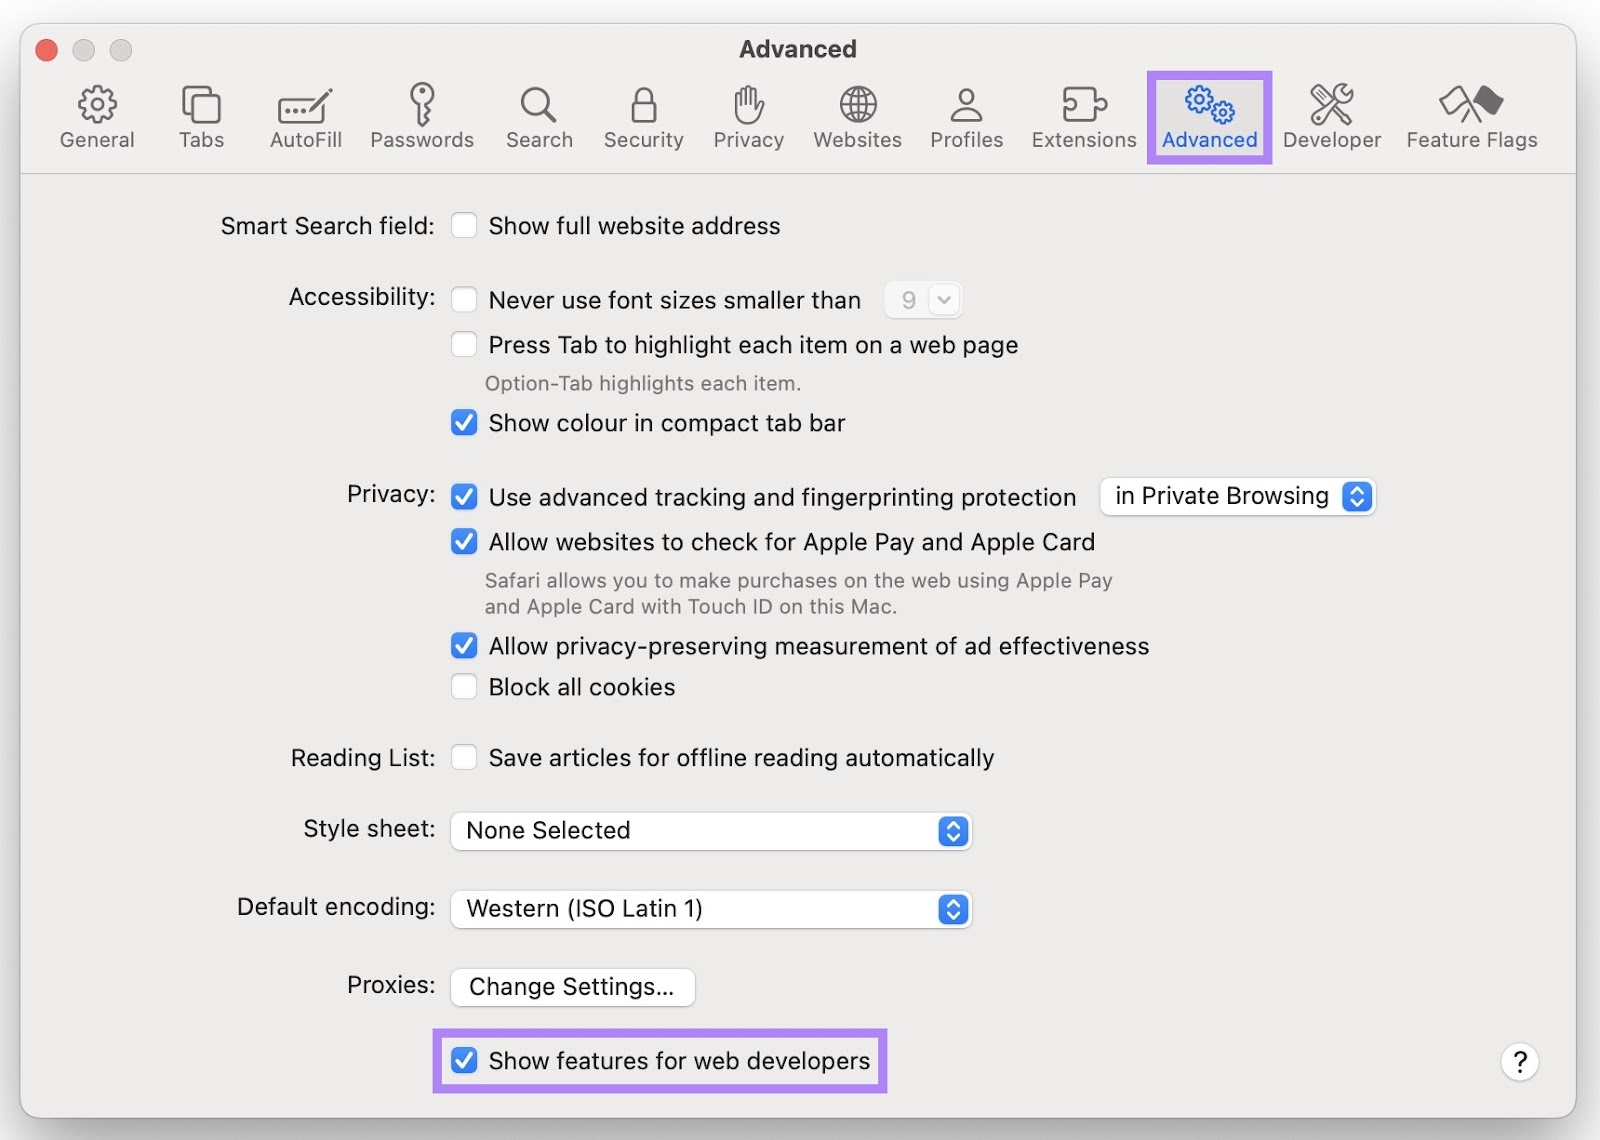
Go to the “Advanced” tab and enable “Show features for web developers.”
Click the new “Develop” tab that appears in the top menu and choose “Empty Caches.”
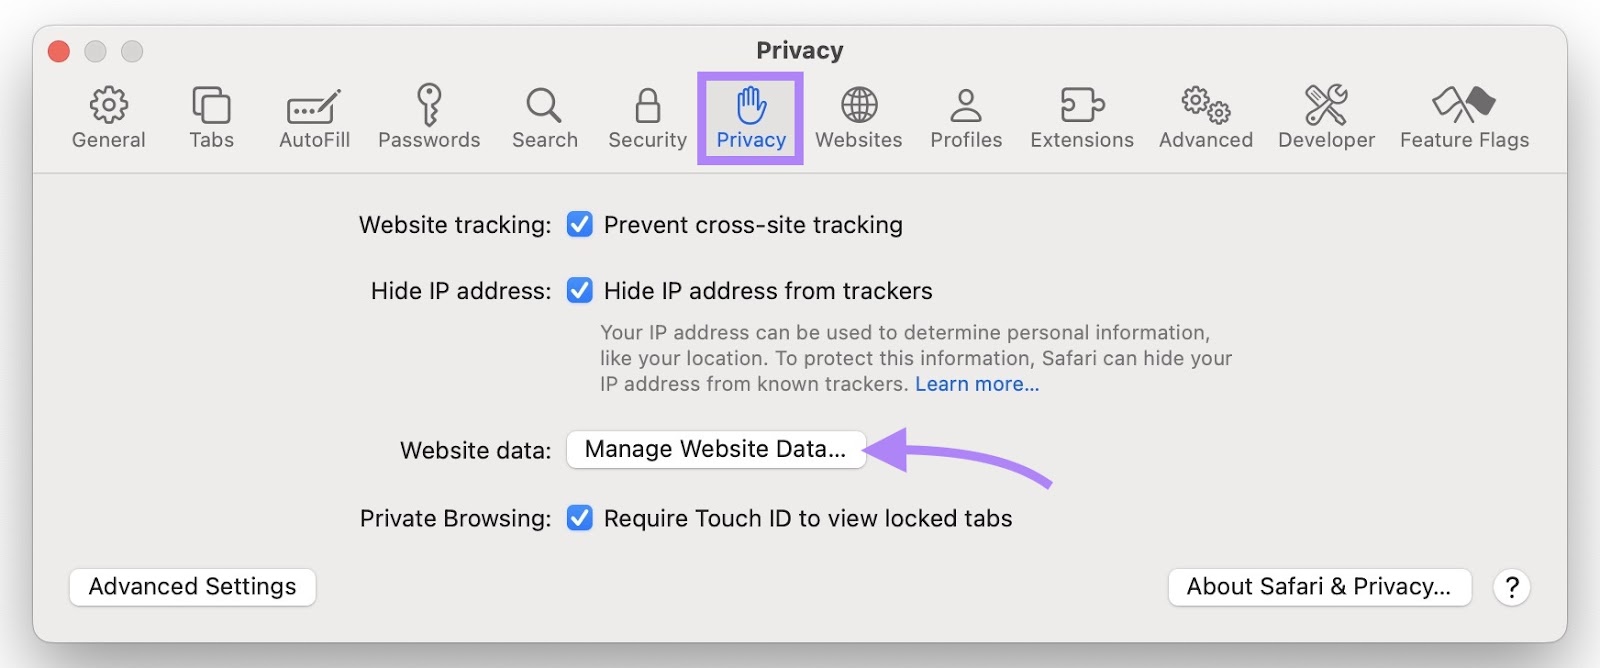
To clear cookies, go to the settings again.
Go to the "Privacy" tab and click "Manage Website Data…"
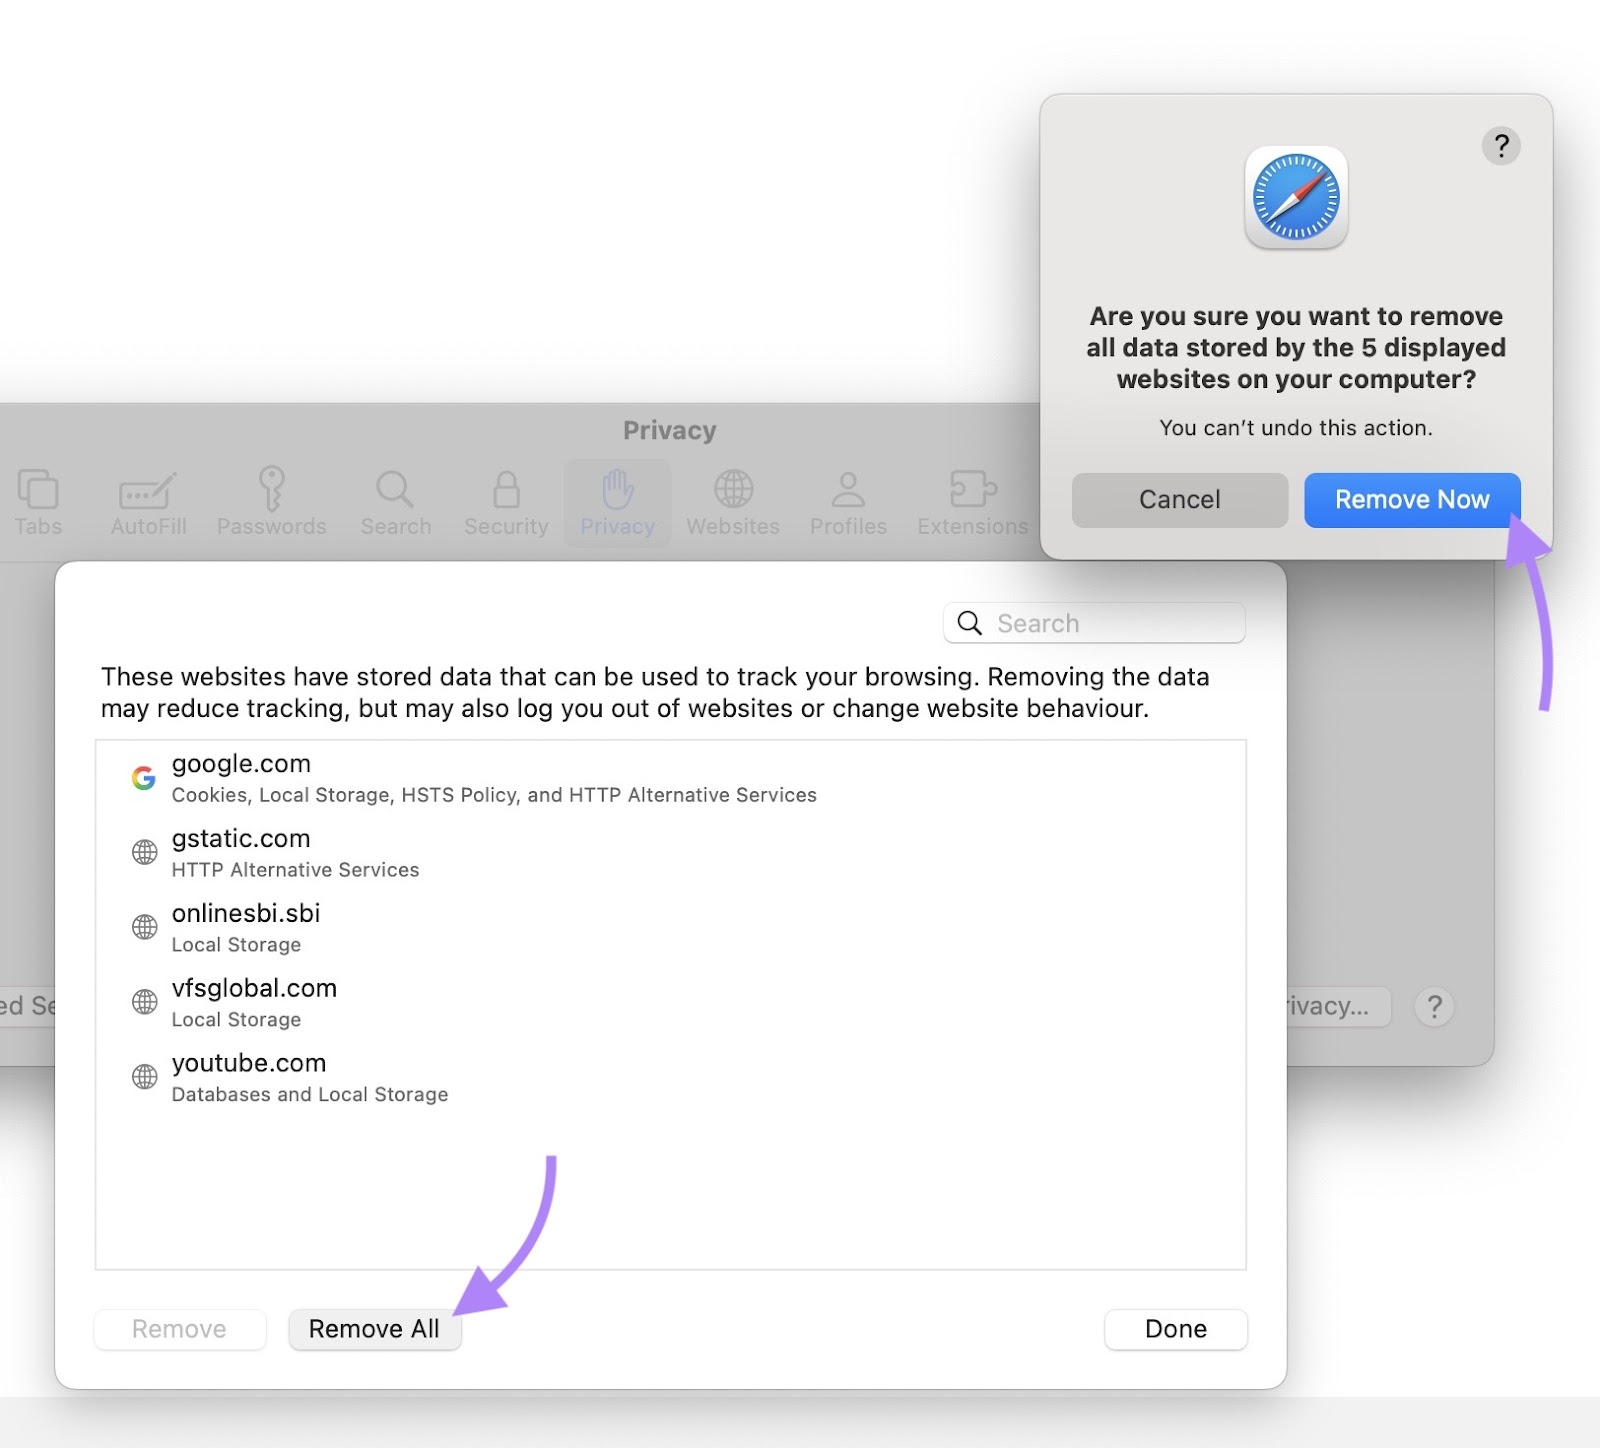
Click "Remove All" and confirm by clicking "Remove Now" when prompted.
Microsoft Edge
Click the three dots in the corner and choose “Settings.”
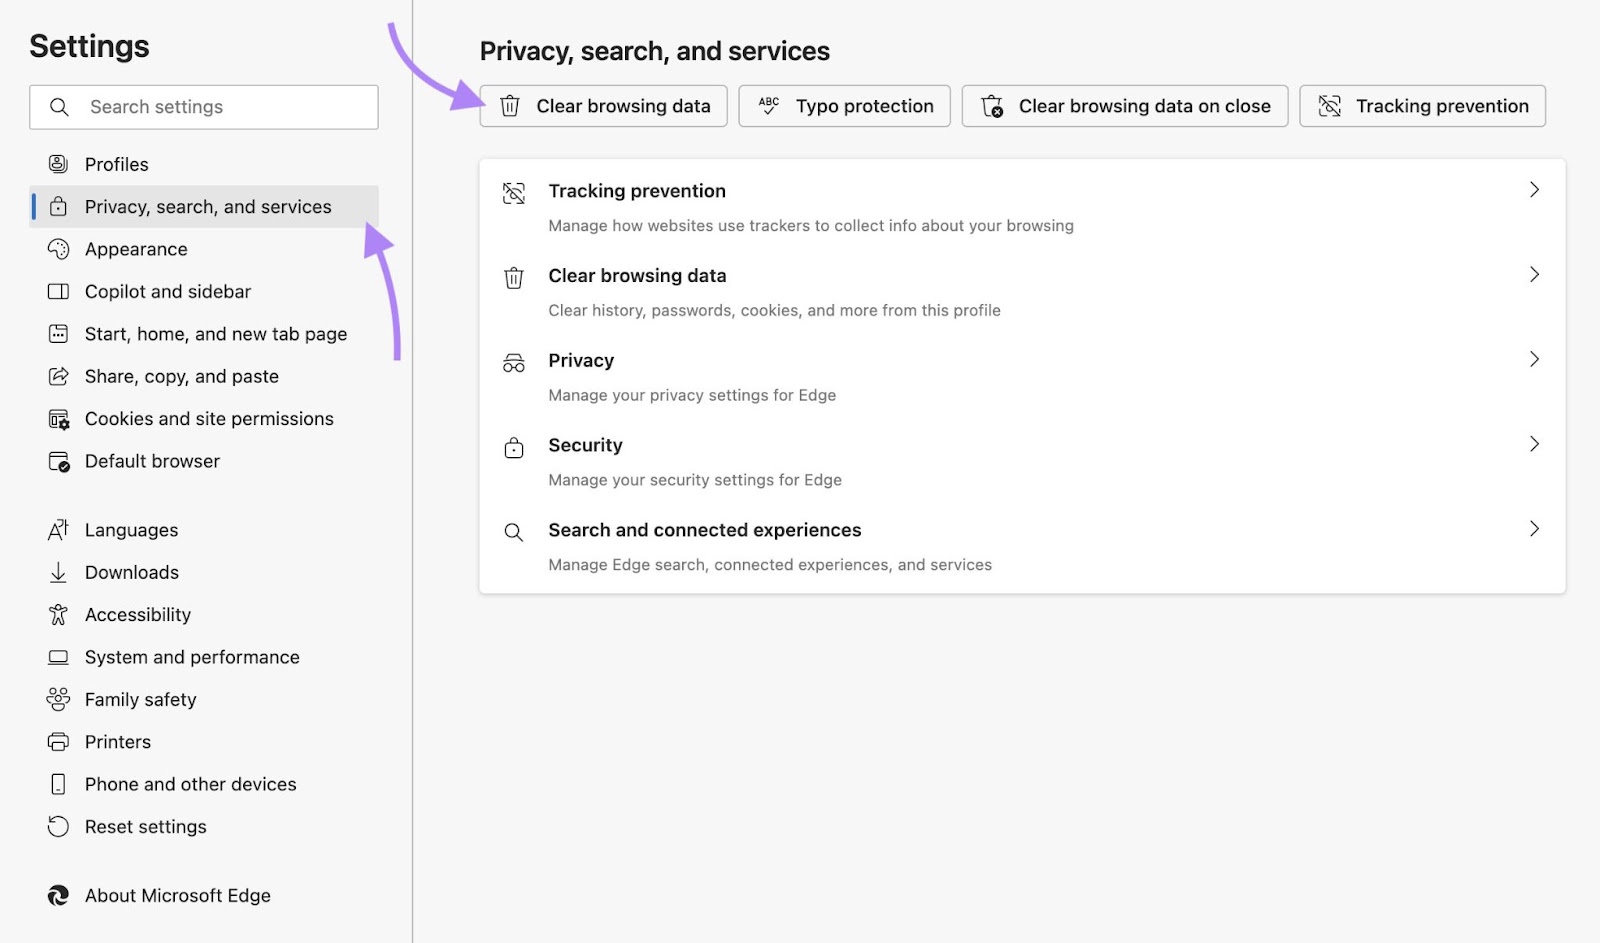
Go to “Privacy, search, and services” in the sidebar. Click “Clear browsing data.”
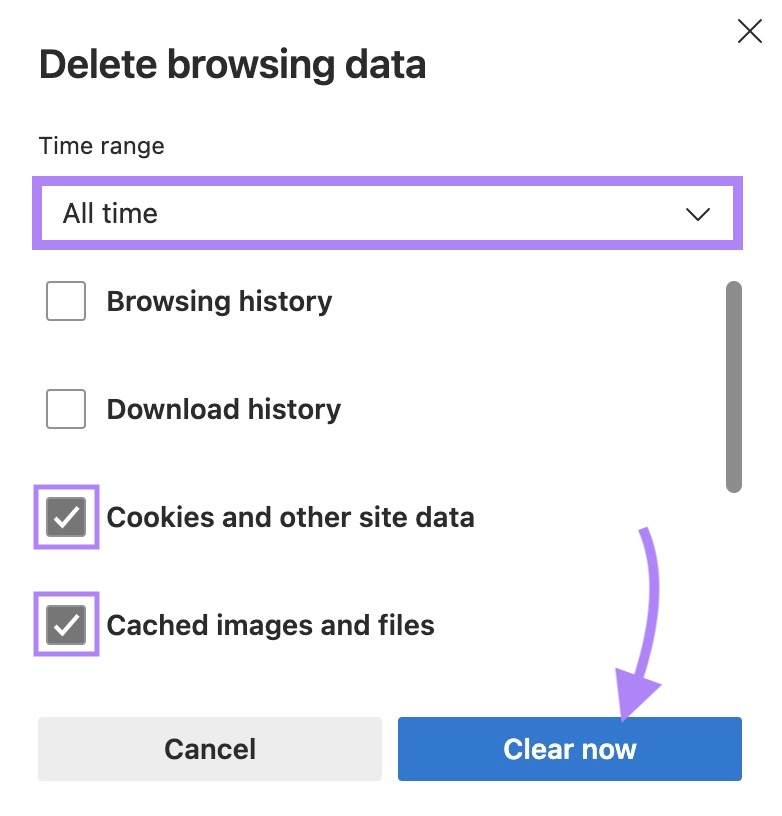
Select the checkboxes next to "Cookies and other site data" and "Cached images and files." You can leave other boxes unchecked.
Select “All time” as the time range. Click "Clear now."
2. Clear Your Website Cache from the CMS
Clearing your website cache removes outdated redirect instructions that your content management system (CMS) or plugins may still be serving.
If you're using WordPress, you may have a caching plugin like WP Super Cache installed.
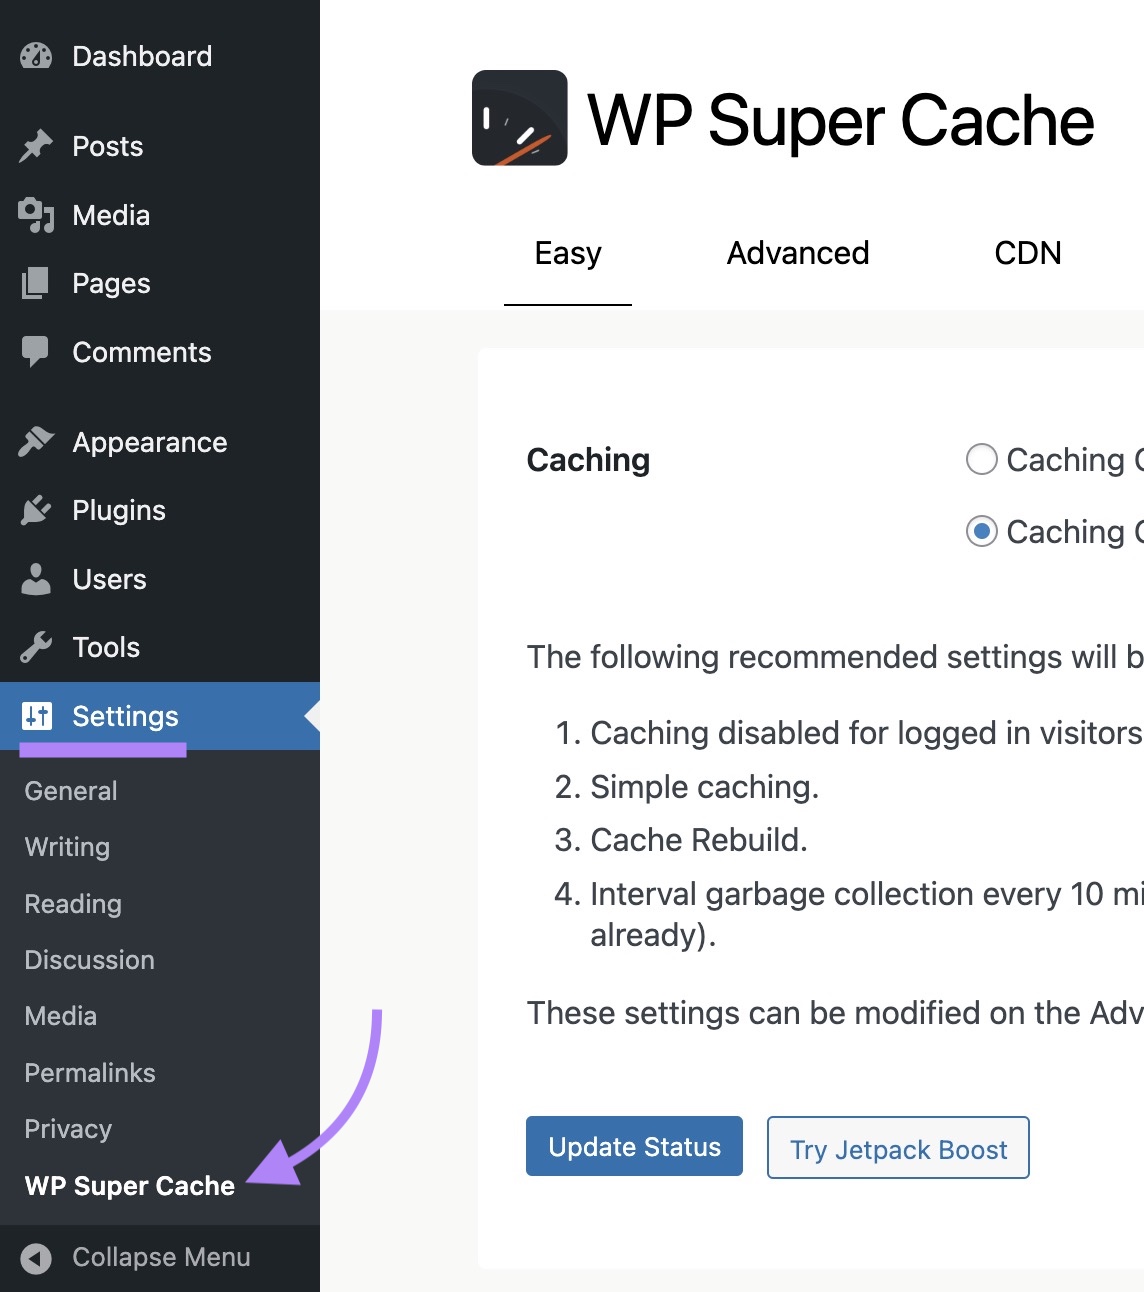
To clear the cache using this plugin, go to your WordPress dashboard, click "Settings" in the left menu, and select "WP Super Cache" in the submenu.
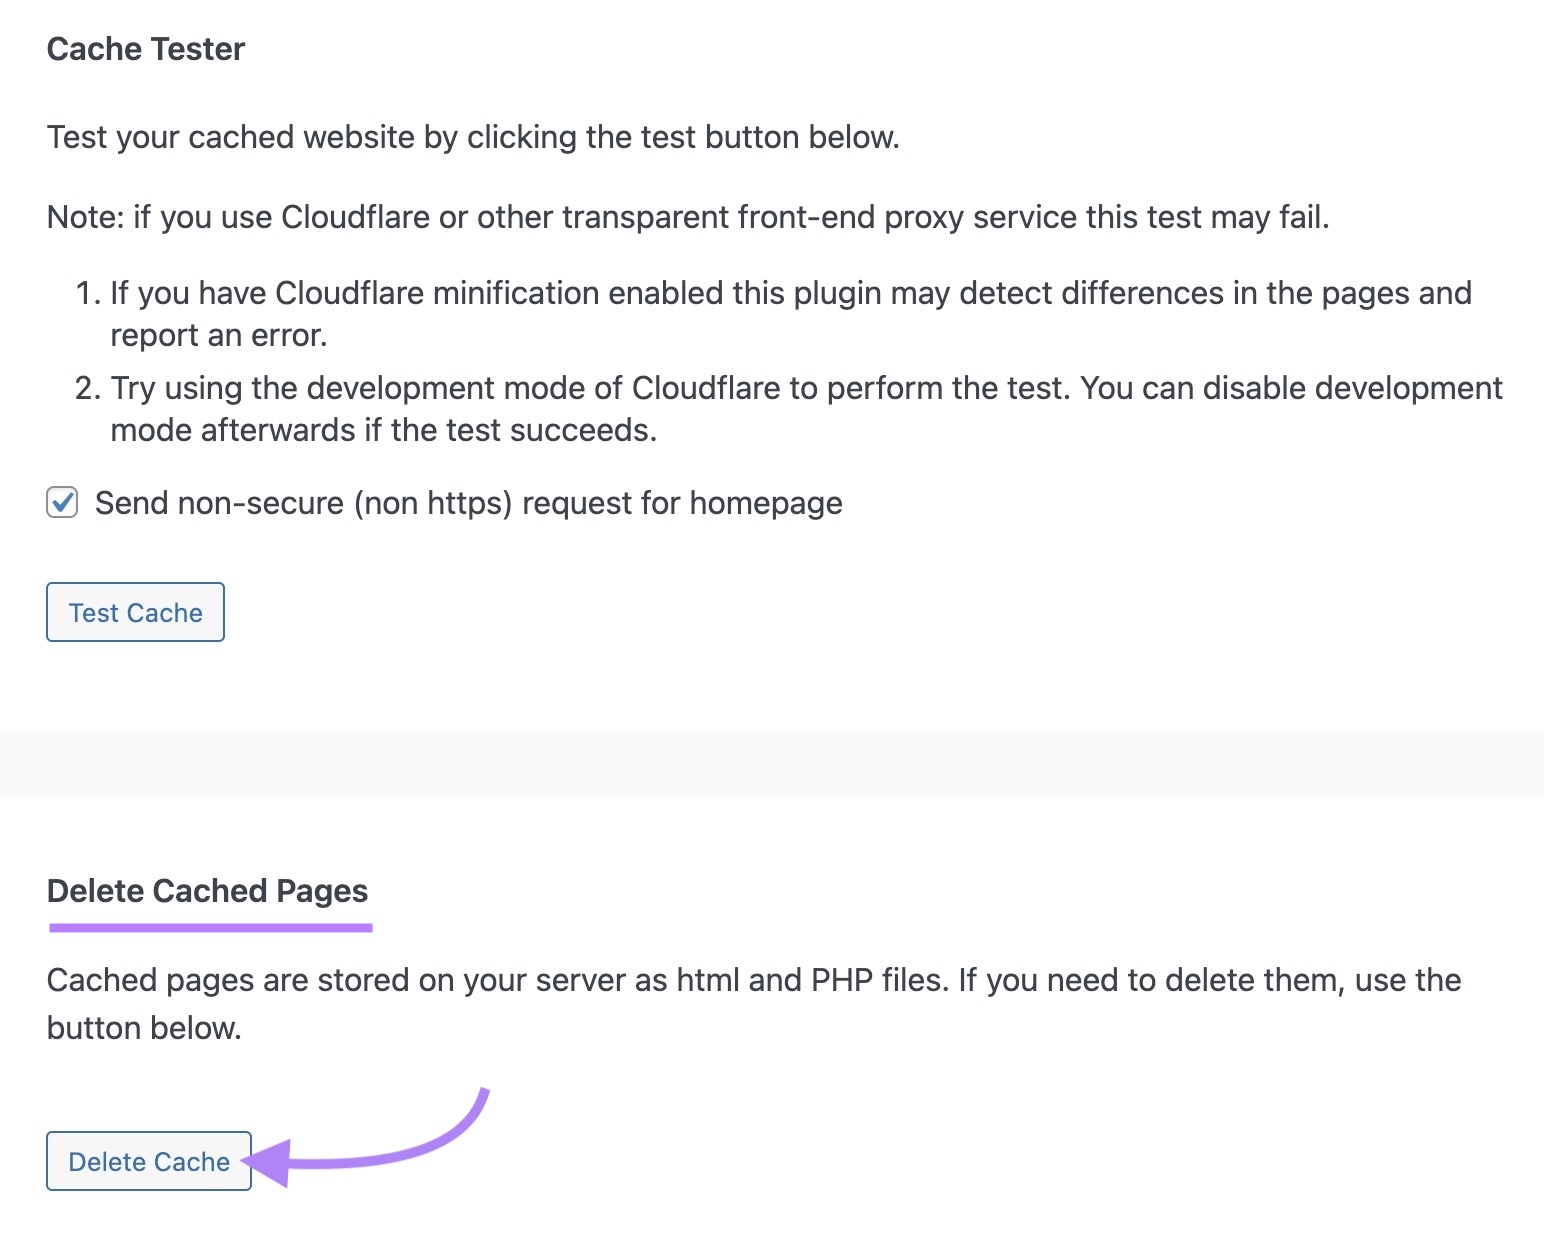
Scroll down to find the "Delete Cached Pages" section and click the "Delete Cache" button.
If you're using a different CMS, follow the steps in the appropriate help documentation:
3. Clear Cached Files from Your Server
Clearing your server cache ensures your server isn’t using outdated files that have redirect errors.
Most hosting providers offer tools to clear the server cache through their control panels.
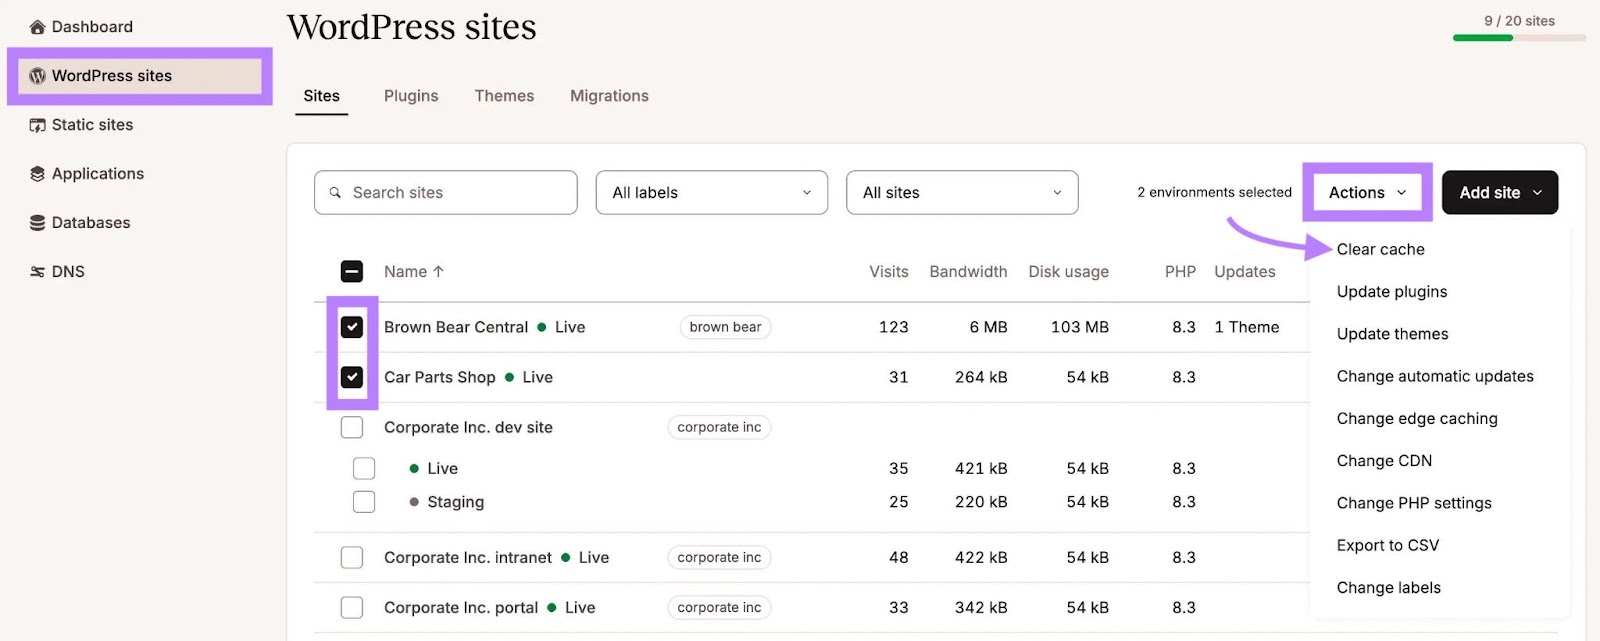
Let’s say you’re using Kinsta to host a WordPress website.
Go to your dashboard, click "WordPress sites," and select the checkbox next to your site.
Click the "Actions" button in the top right corner and choose "Clear cache."
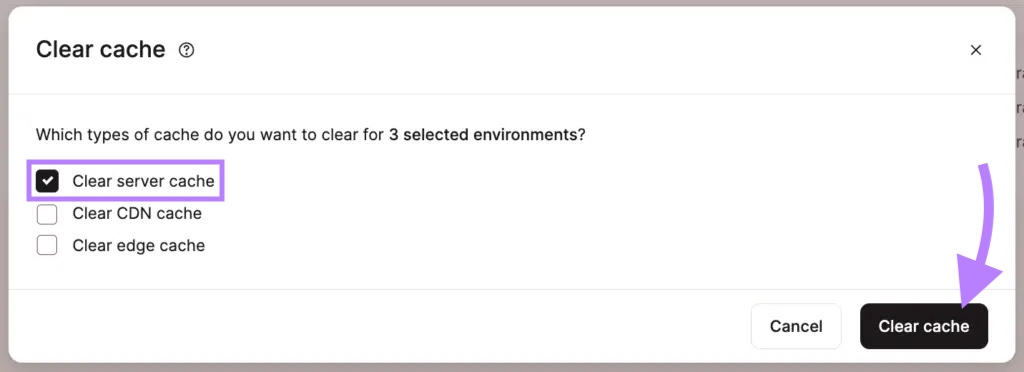
Select the checkbox next to “Clear server cache” and click “Clear cache.”
Other hosting providers also have built-in cache-related tools. If you’re having trouble, reach out to your provider’s support team for help.
4. Clear Old Redirects from Your CDN
A content delivery network (CDN) speeds up your site by saving copies of it in different places around the world. But if those copies have old redirect settings, they can keep causing the loop.
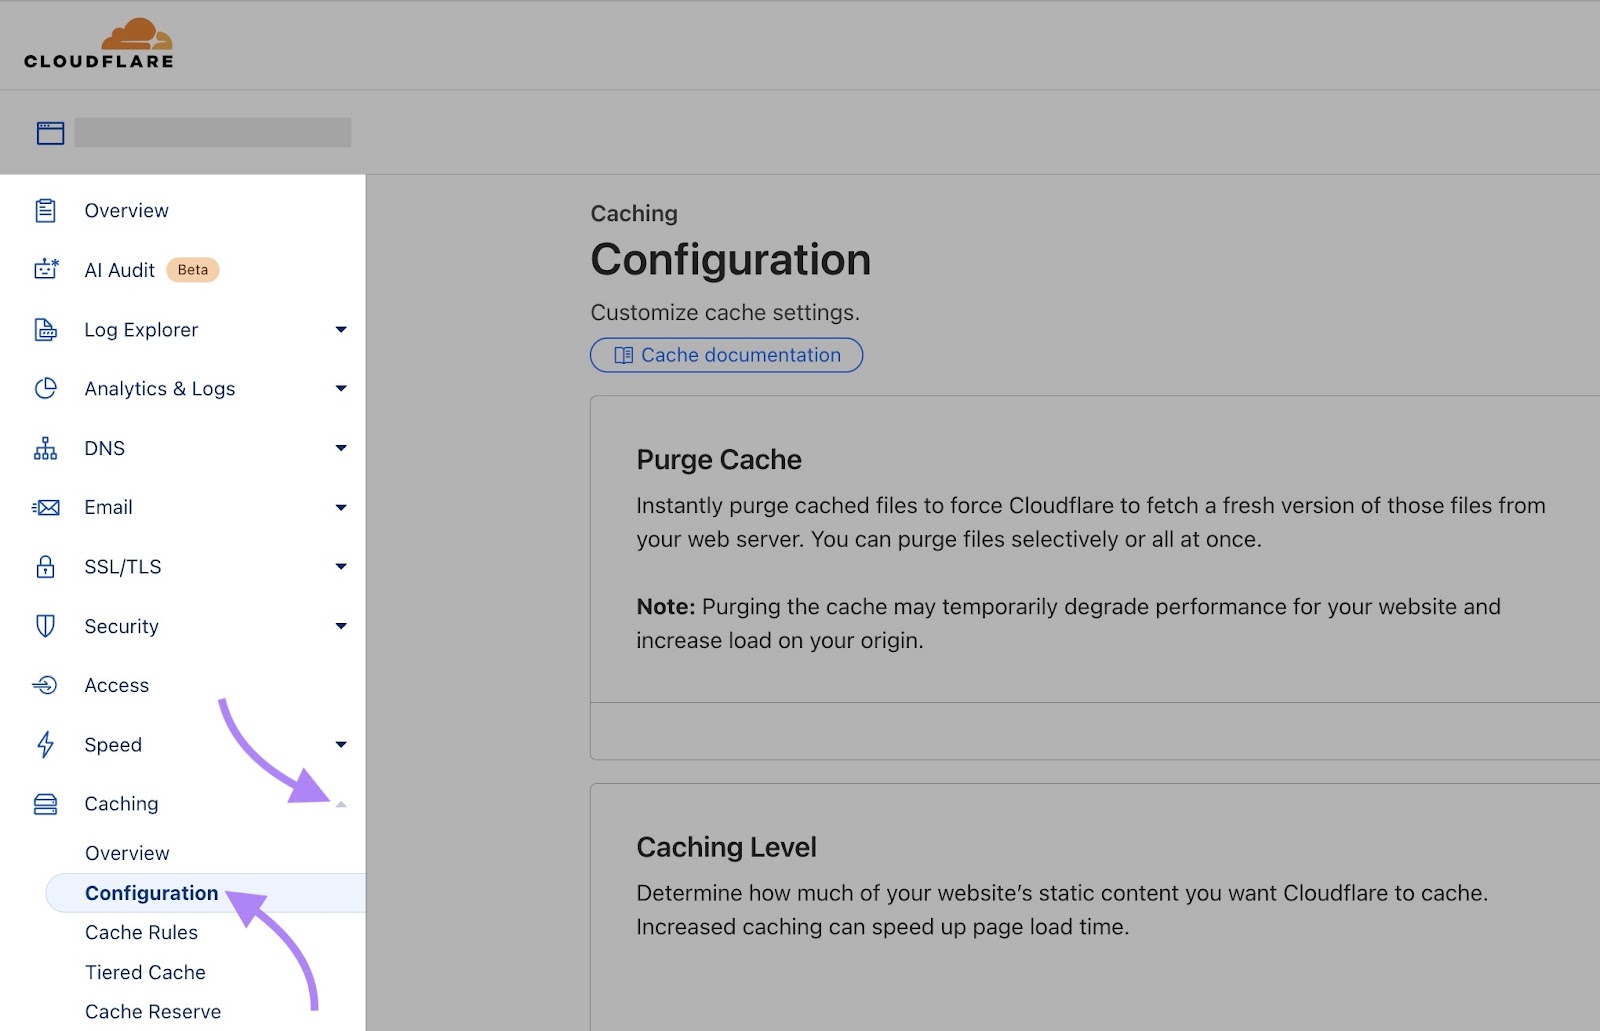
Let's say you use Cloudflare as your CDN.
Go to your Cloudflare dashboard, choose your account and your site, click "Caching" in the left menu, and select “Configuration.”
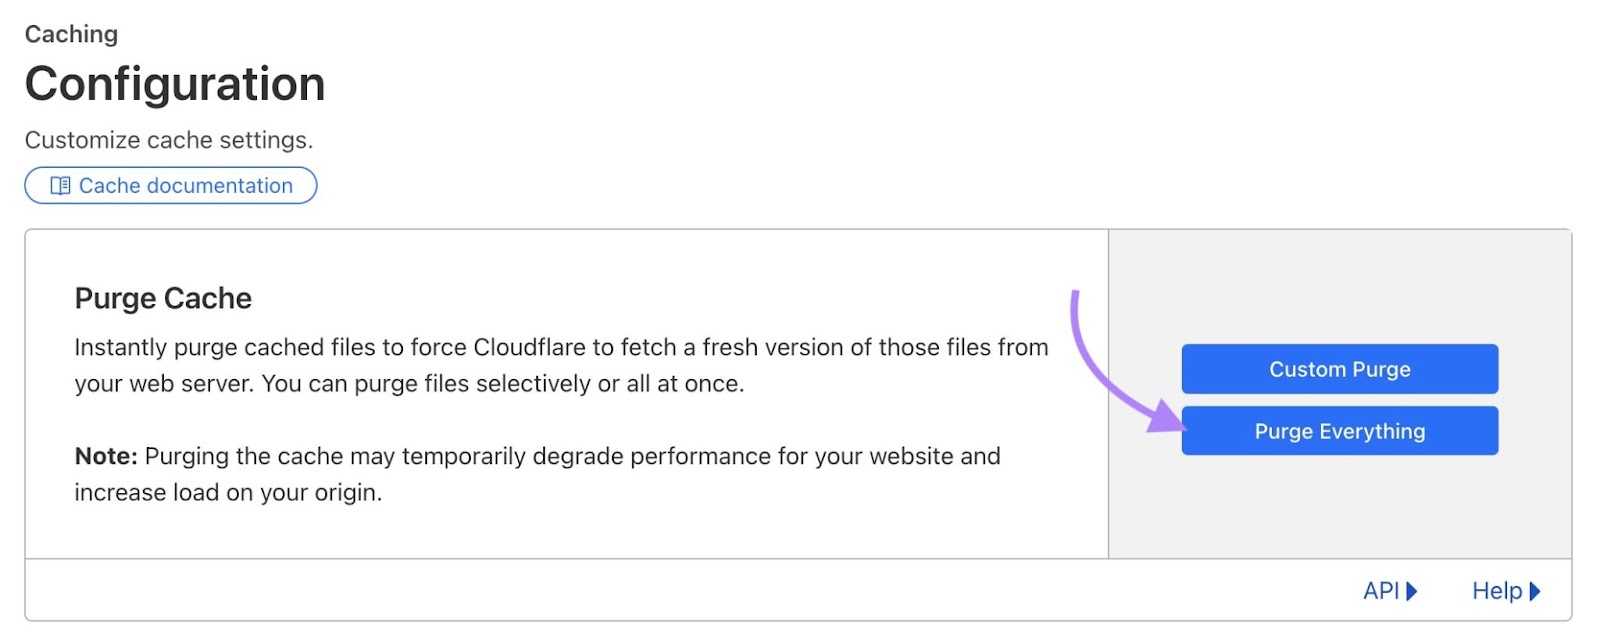
Click "Purge Everything."
For other CDNs, follow the appropriate documentation:
5. Check for HTTPS-Related Problems
Making sure you have a properly implemented SSL certificate (which verifies your site’s identity and enables you to use HTTPS) and that you aren’t trying to force HTTPS without one can fix redirect loops.
Use an SSL checker like SSL Shopper to confirm your certificate is valid and installed correctly.
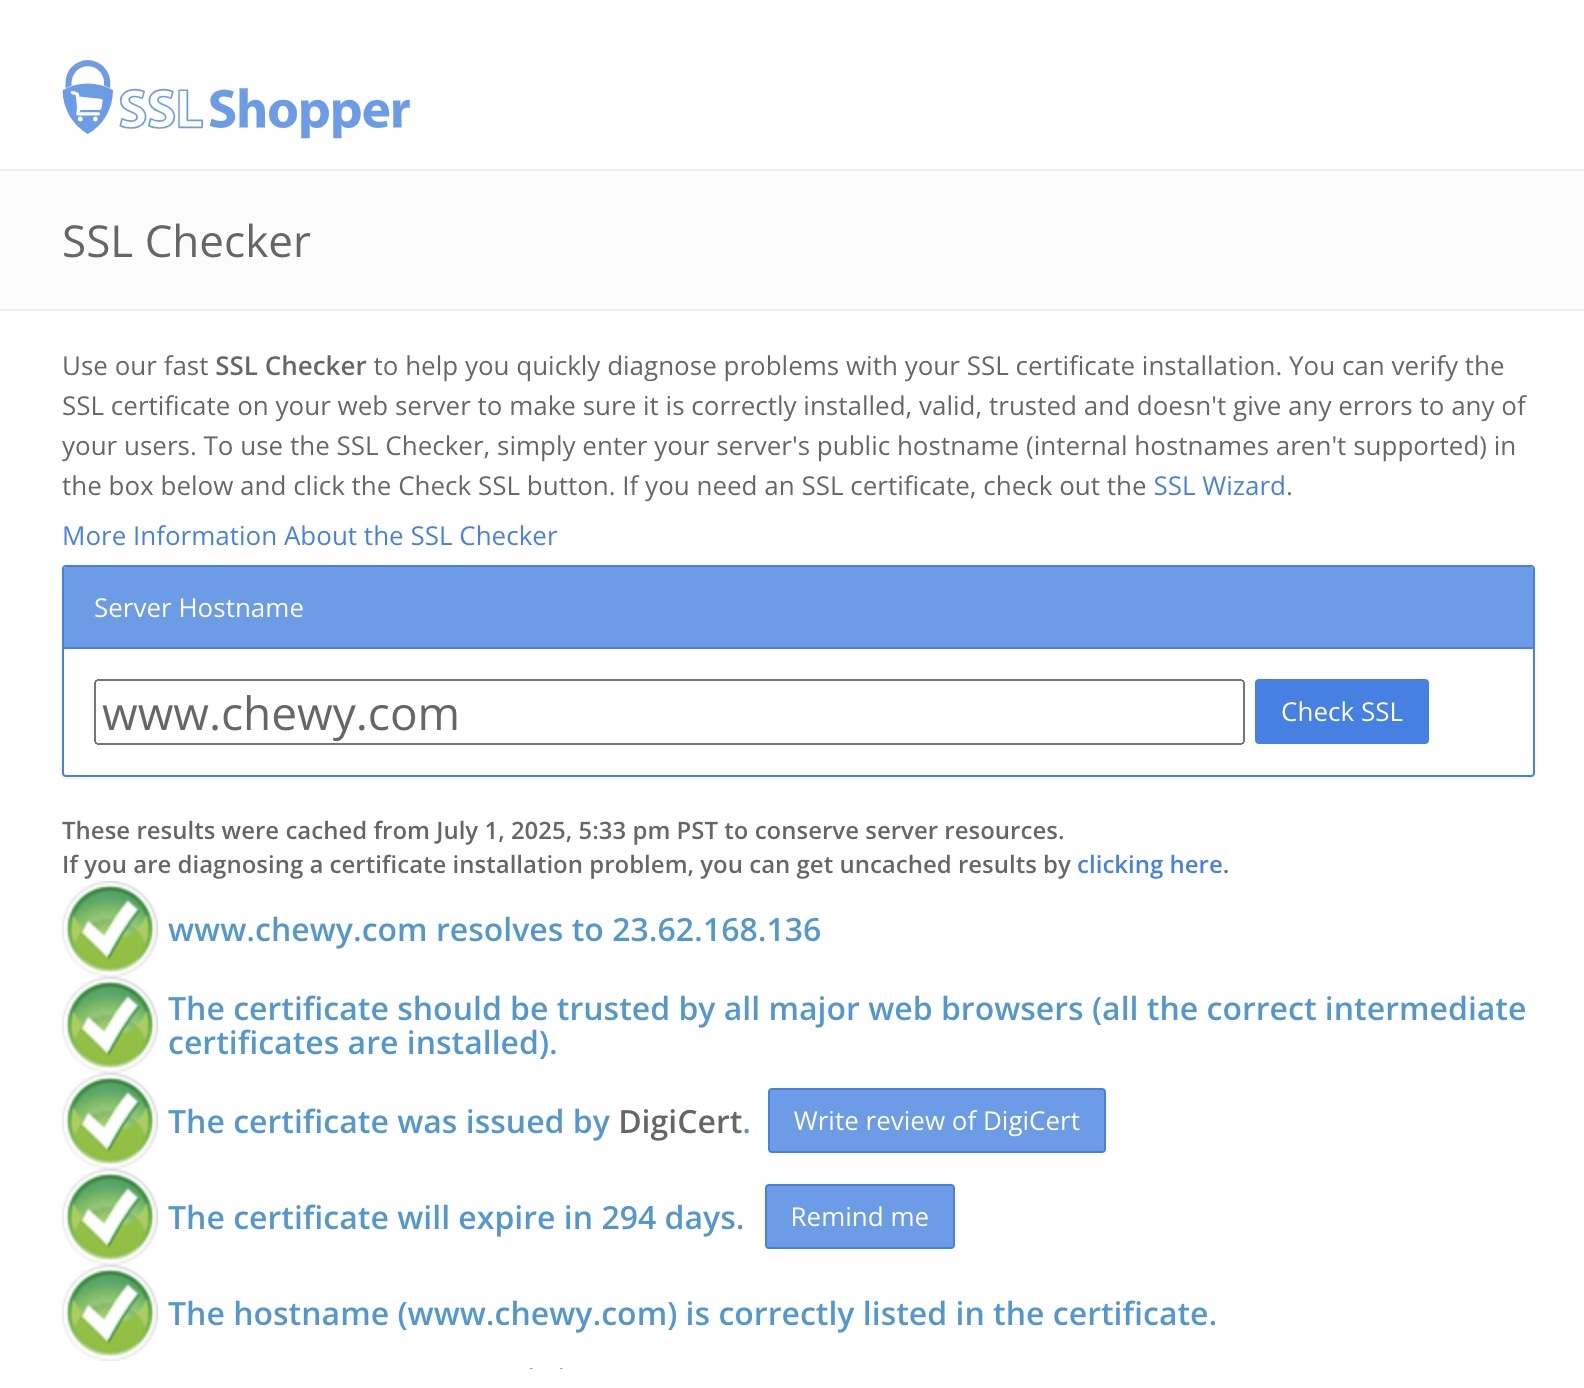
If there’s a problem, ask your hosting provider for help.
You can also find HTTPS issues using Semrush’s Site Audit tool.
Go to your “Overview” report, find the HTTPS section, and click “View details.”
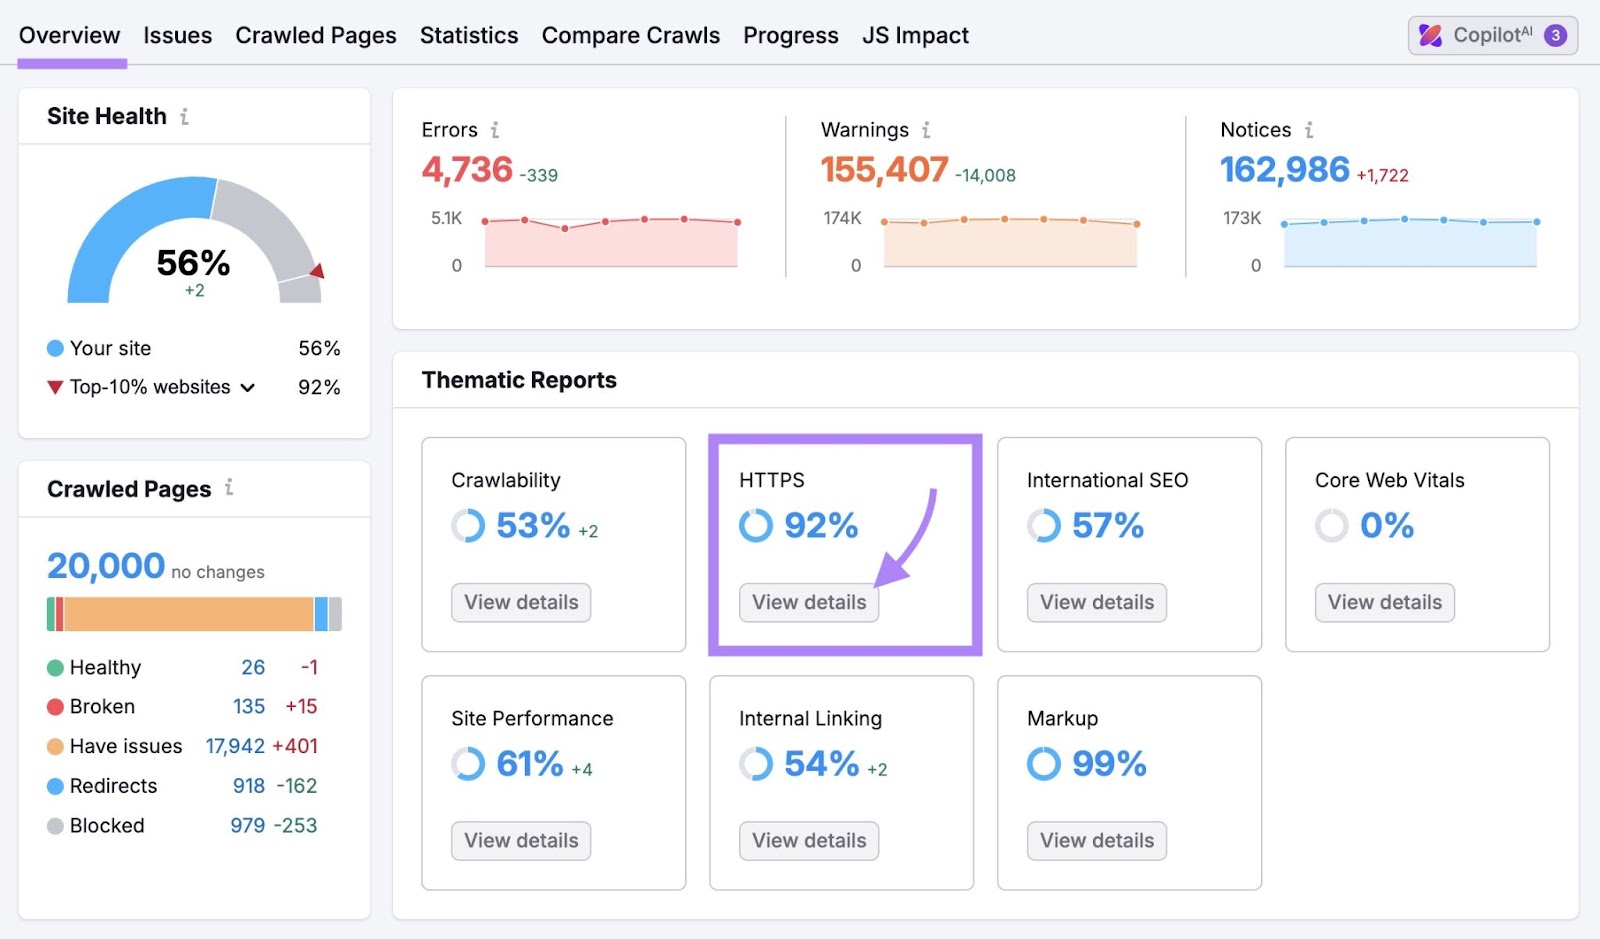
Further reading: How to Redirect HTTP to HTTPS (4 Methods)
6. Review and Fix Redirect Rules
Conflicting redirect rules can create loops that trigger ERR_TOO_MANY_REDIRECTS error.
You can see these loops in your Site Audit Issues report:
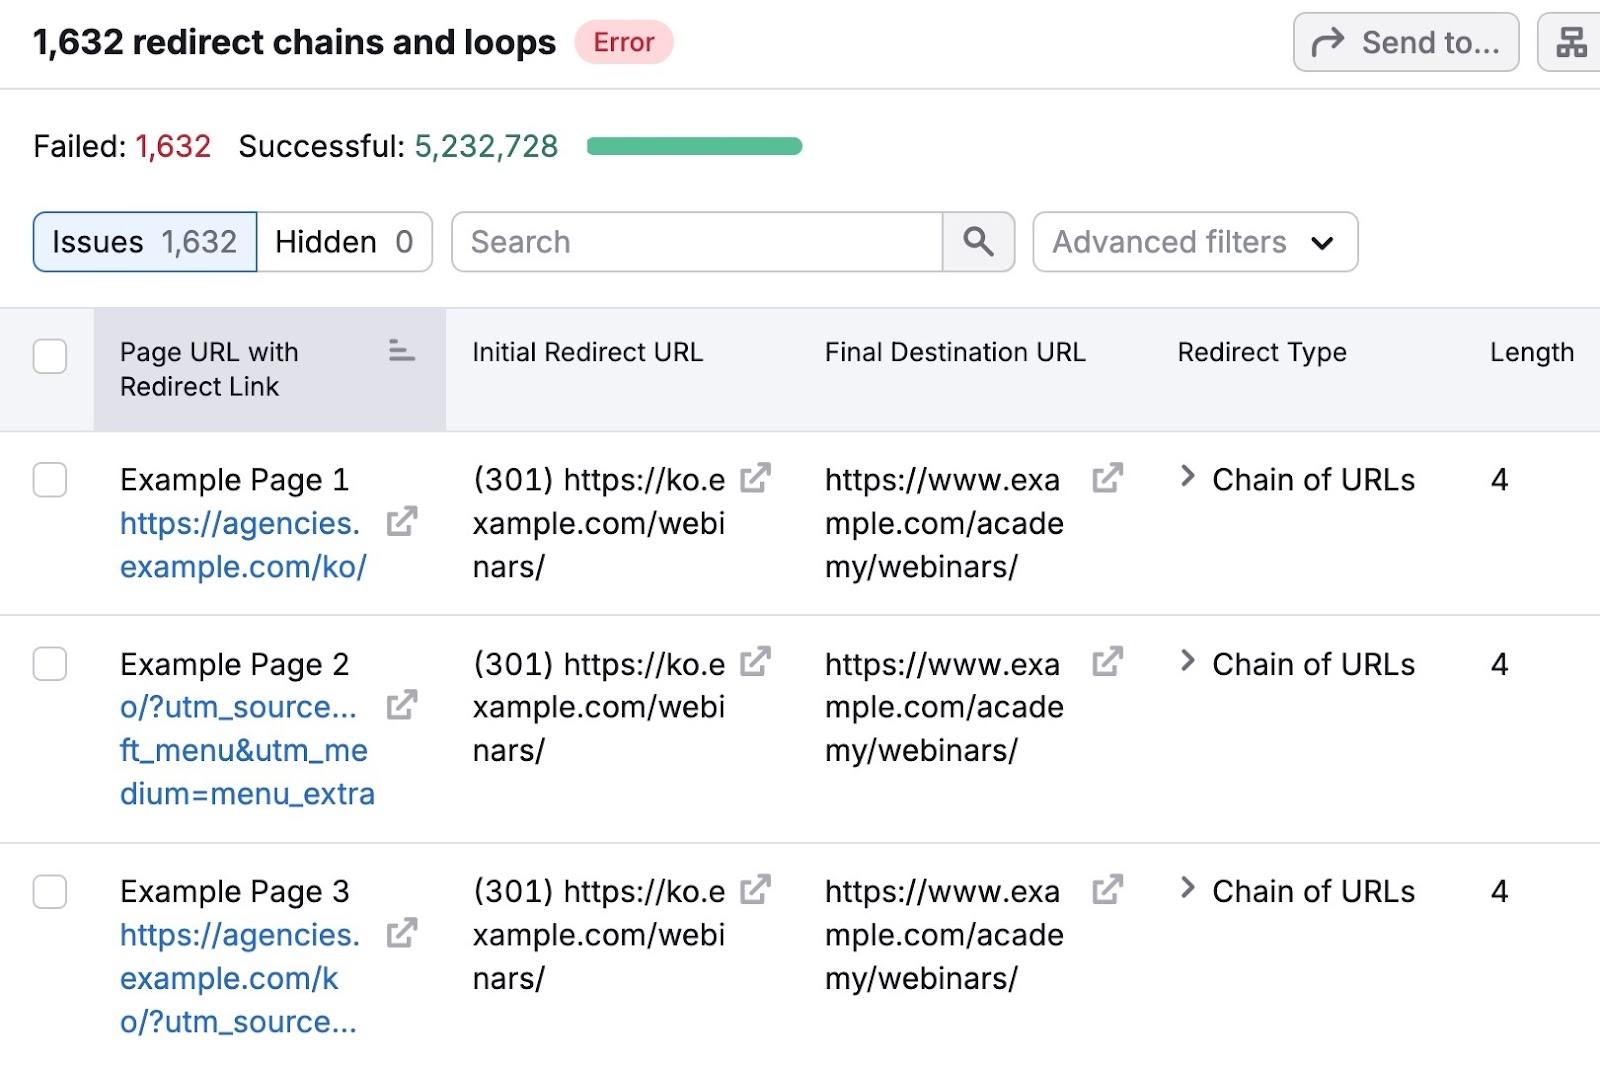
To fix the issue, update or remove the conflicting redirect rules using whatever tool or platform you used to set them up.
This could be a plugin, your CMS settings, or a server config file.
For example, if you're using WordPress with the Redirection plugin, you can view all active redirect rules in the plugin's dashboard.
Edit or delete any rule causing loops.
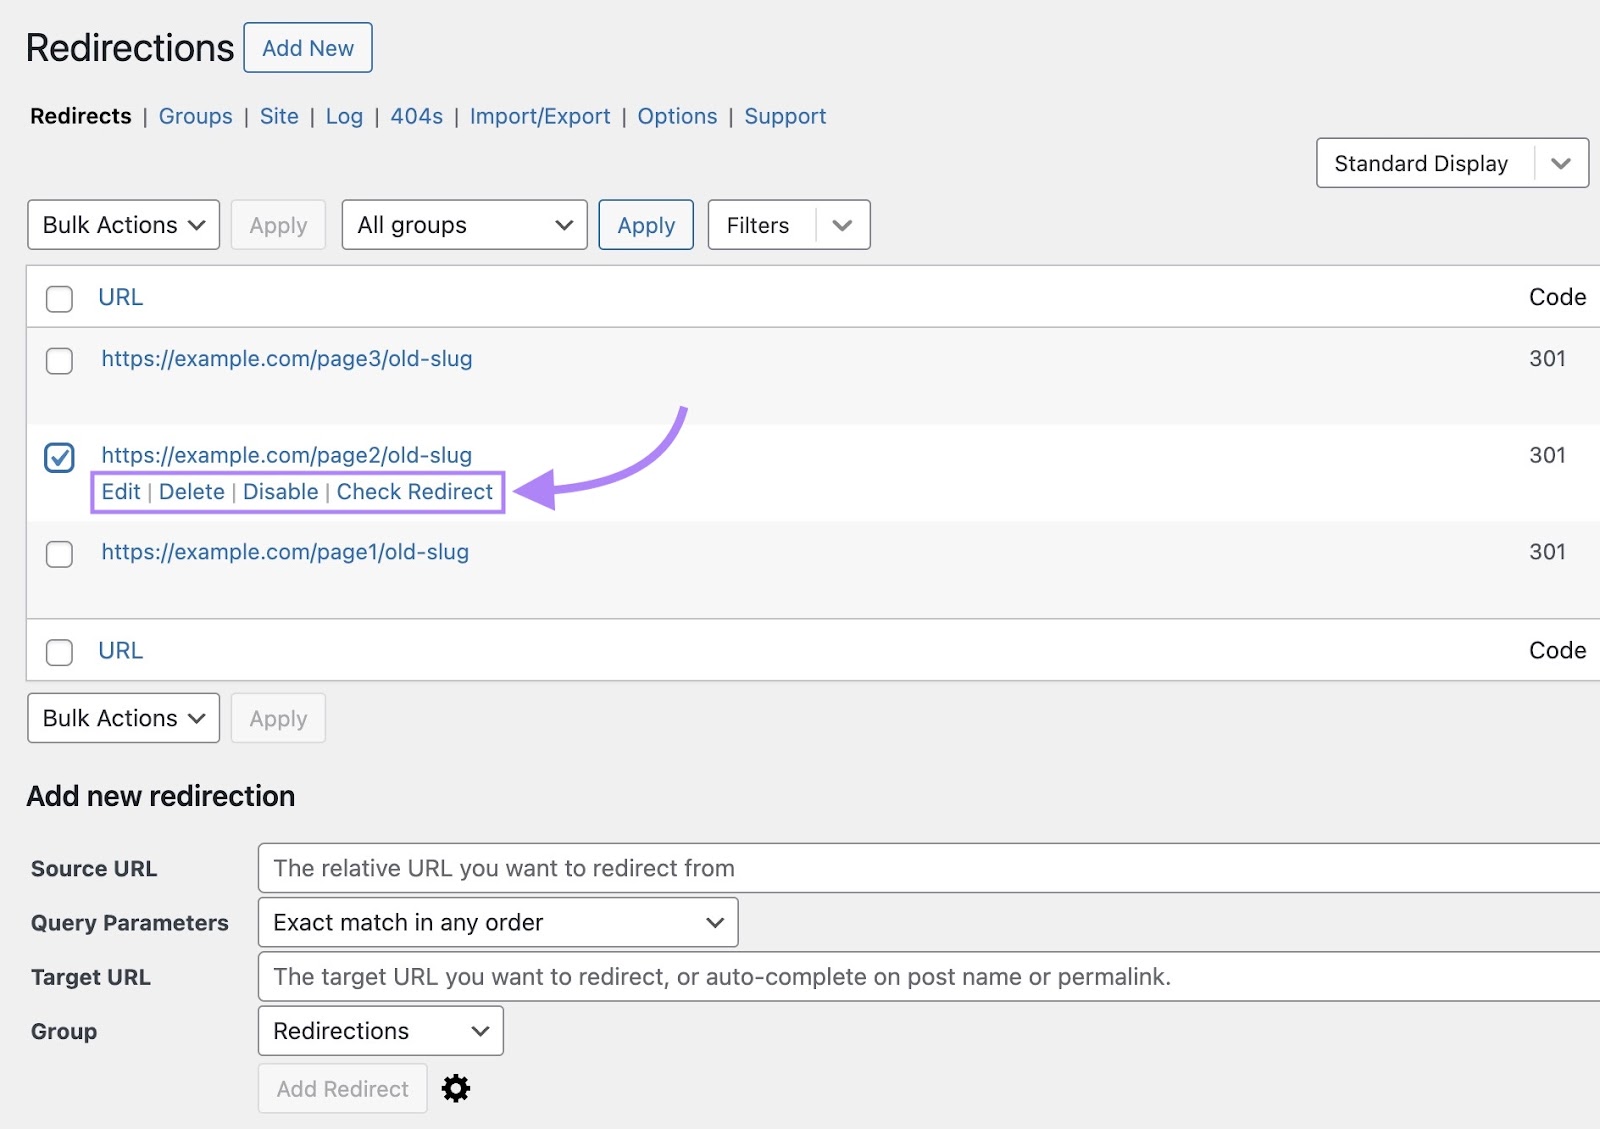
If you’re on an Apache server, your redirect rules might live in a file called .htaccess.
You can reset this file to remove problematic rules.
But only do this if you're confident editing server files or have help from a developer.
To reset it, access your website files through your hosting provider’s File Manager or connect using FTP.
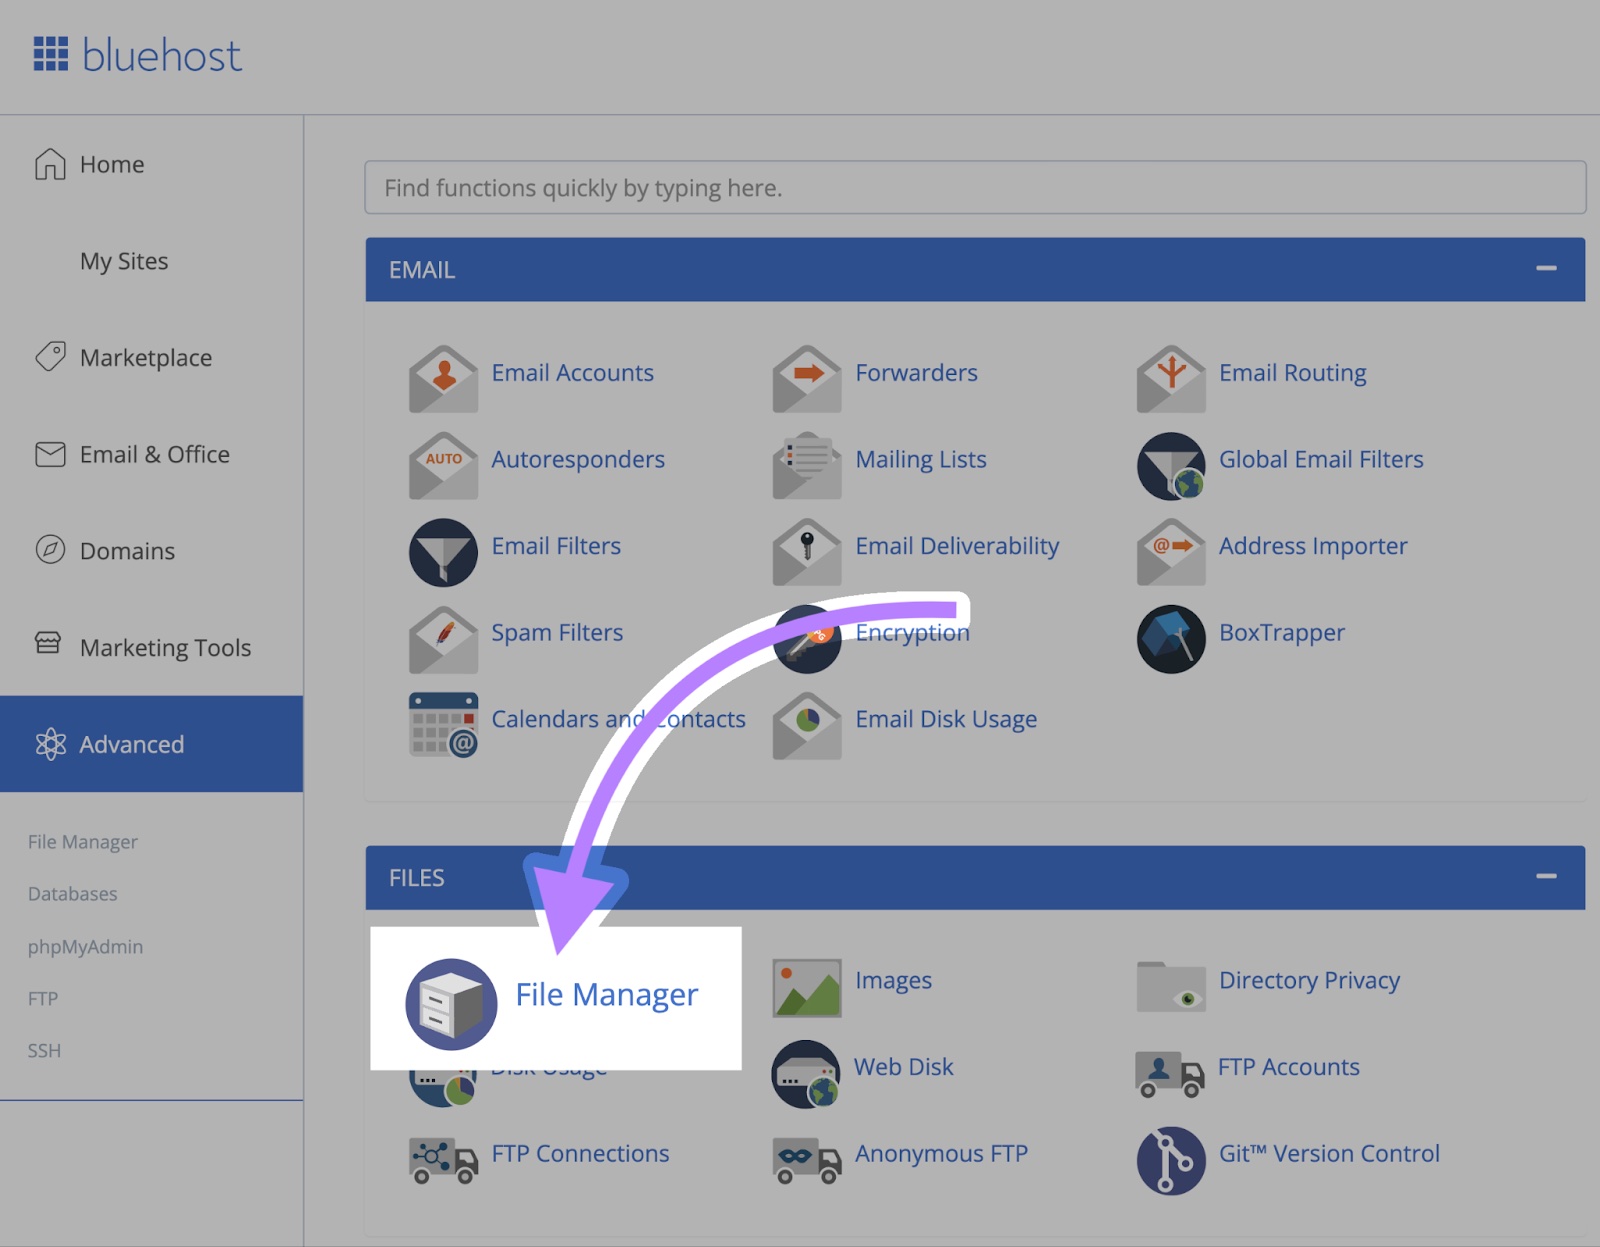
Let’s say you're using Bluehost. Go to your cPanel and click “File Manager.”
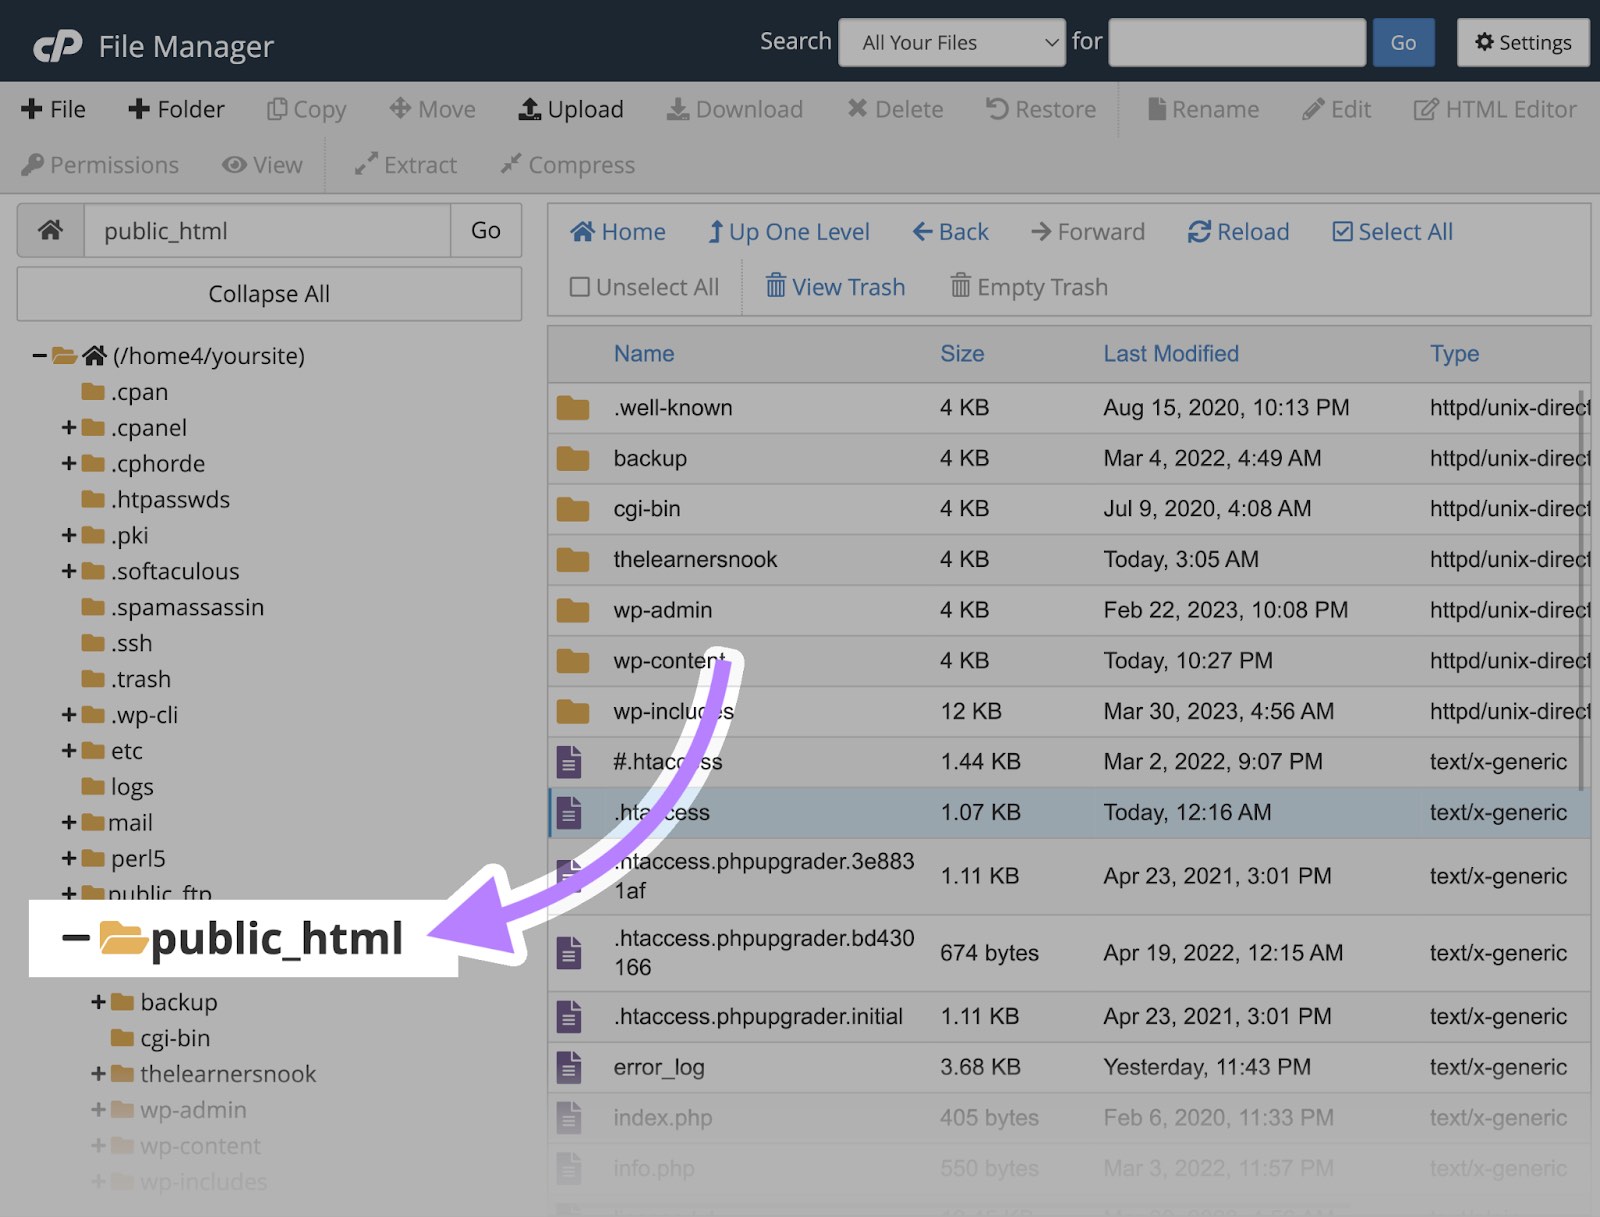
Navigate to your website's root directory (usually named "public_html," "www," or "htdocs").
Find the .htaccess file
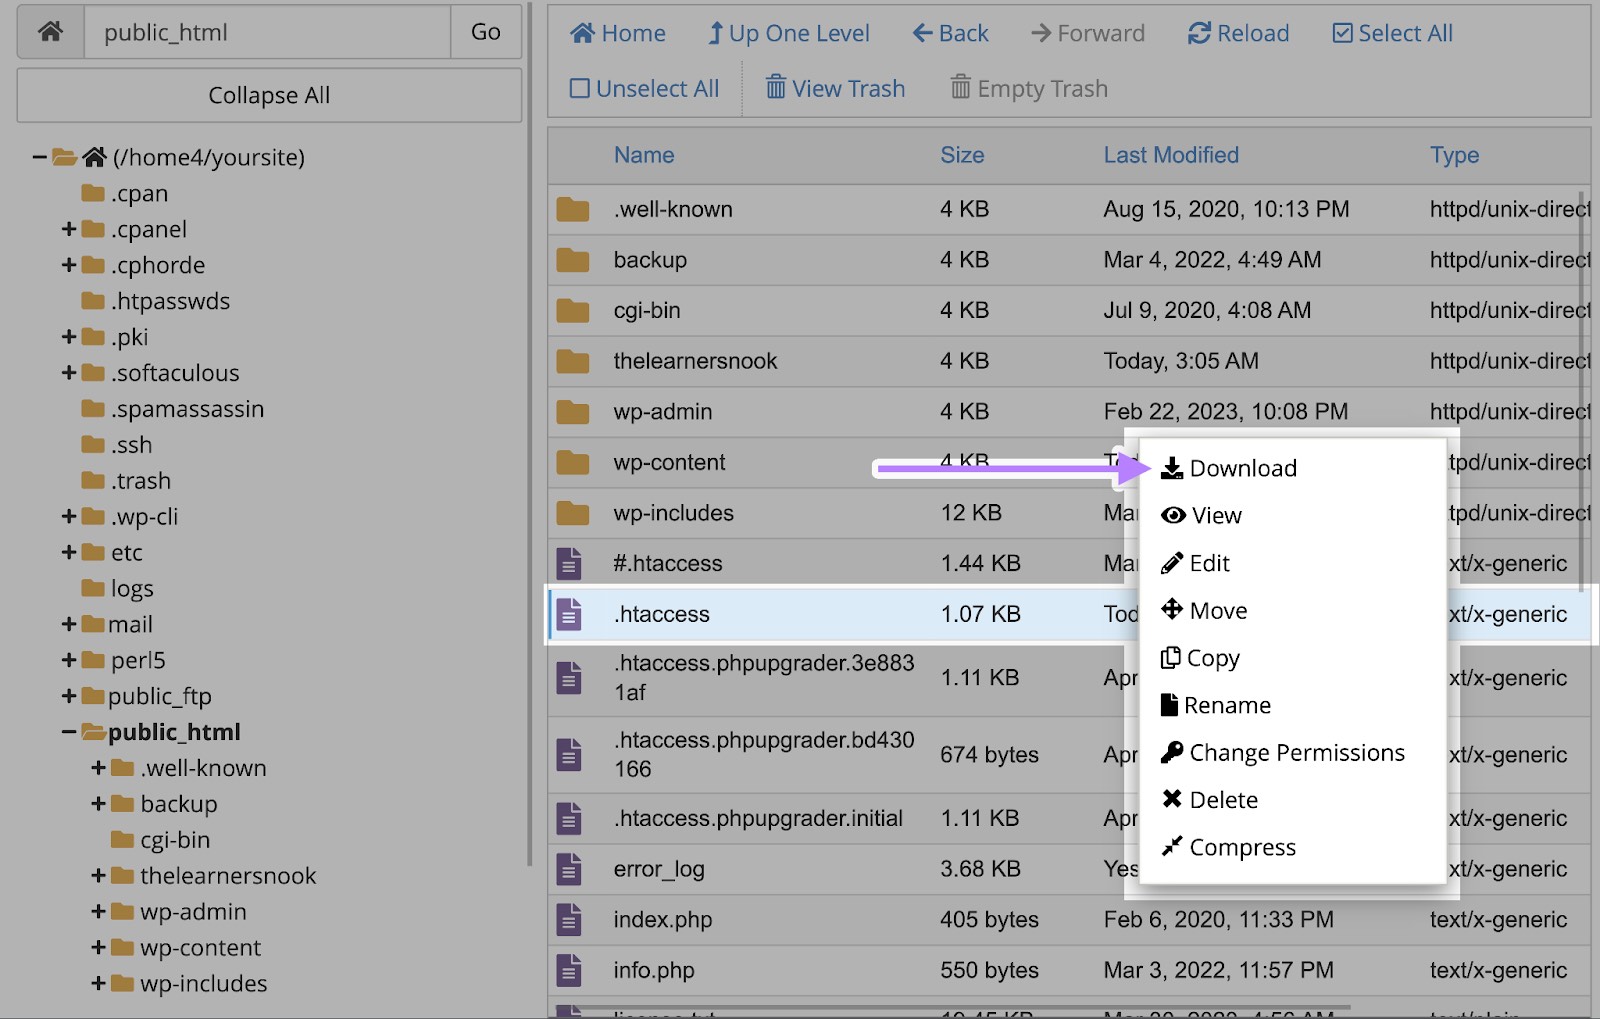
Before editing, download a copy to back it up. Right-click the file and choose “Download.”
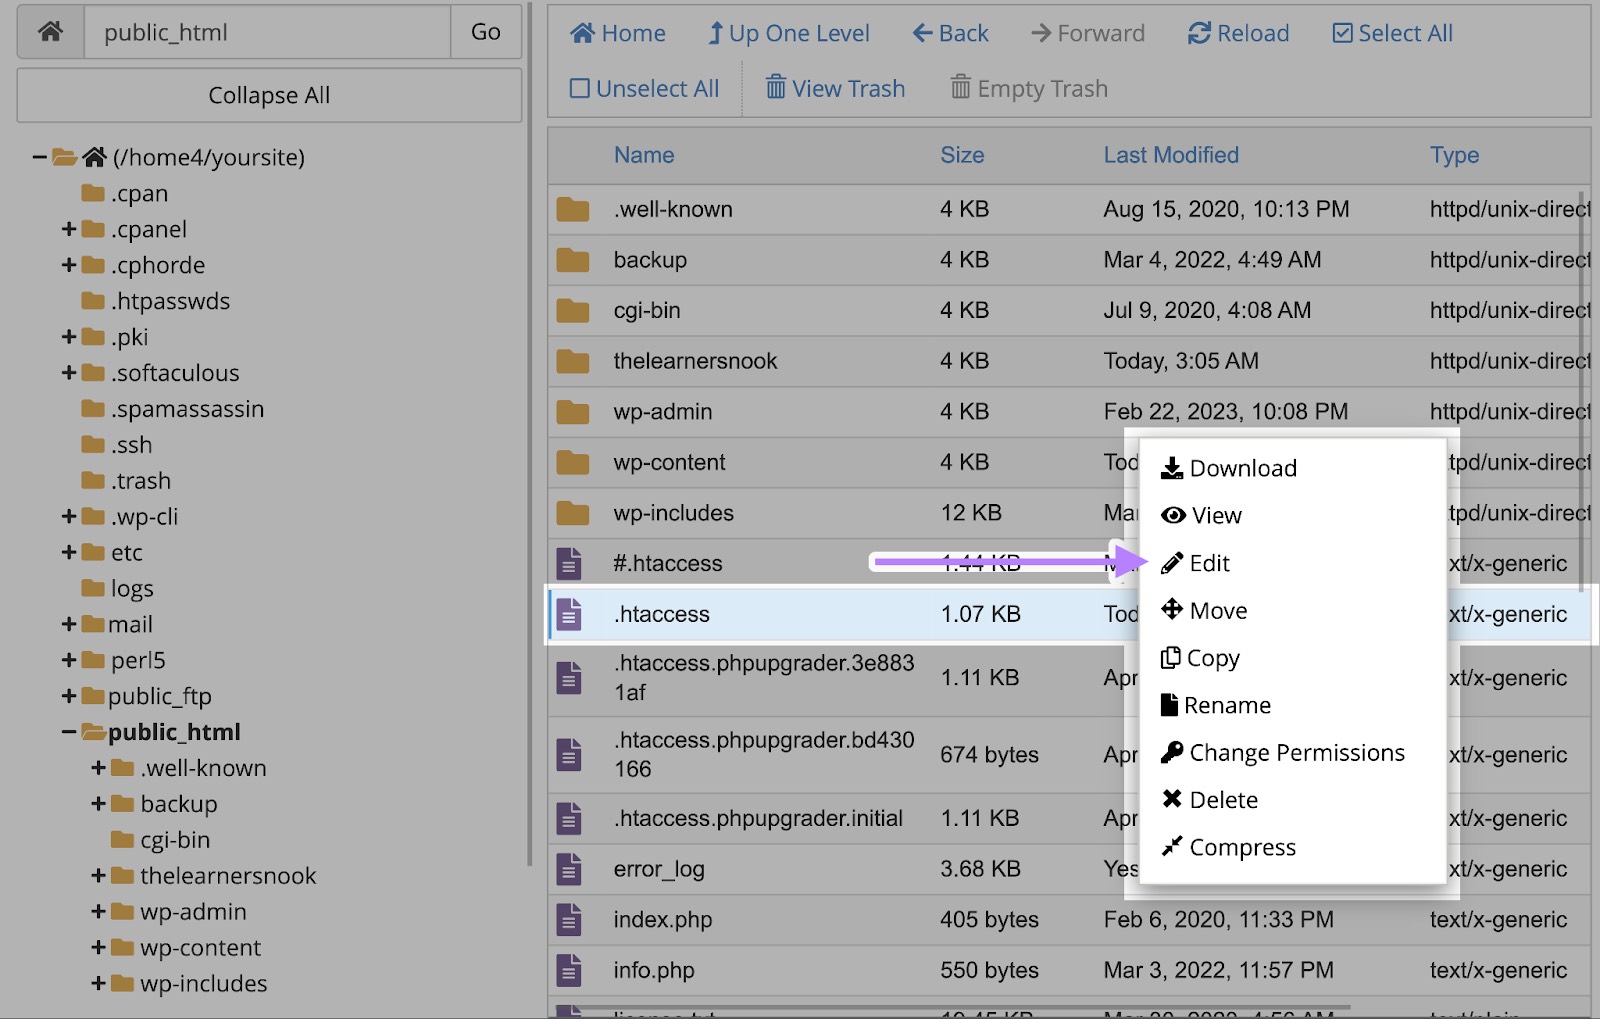
Then, right-click on the .htaccess file again and select "Edit."
Replace the entire content with this default WordPress .htaccess configuration:
# BEGIN WordPress
RewriteEngine On
RewriteRule .* - [E=HTTP_AUTHORIZATION:%{HTTP:Authorization}]
RewriteBase /
RewriteRule ^index\.php$ - [L]
RewriteCond %{REQUEST_FILENAME} !-f
RewriteCond %{REQUEST_FILENAME} !-d
RewriteRule . /index.php [L]
# END WordPress
Save your changes and check if the redirect error is resolved.
If your site uses Nginx or another server type, contact your hosting provider or developer for help.
7. Check URL Settings in Your CMS
Redirect loops can happen when your CMS uses two slightly different versions of your site’s URL.
If you use WordPress, go to “Settings” > “General.”
Look at the "WordPress Address (URL)" and "Site Address (URL)" fields. These should match.
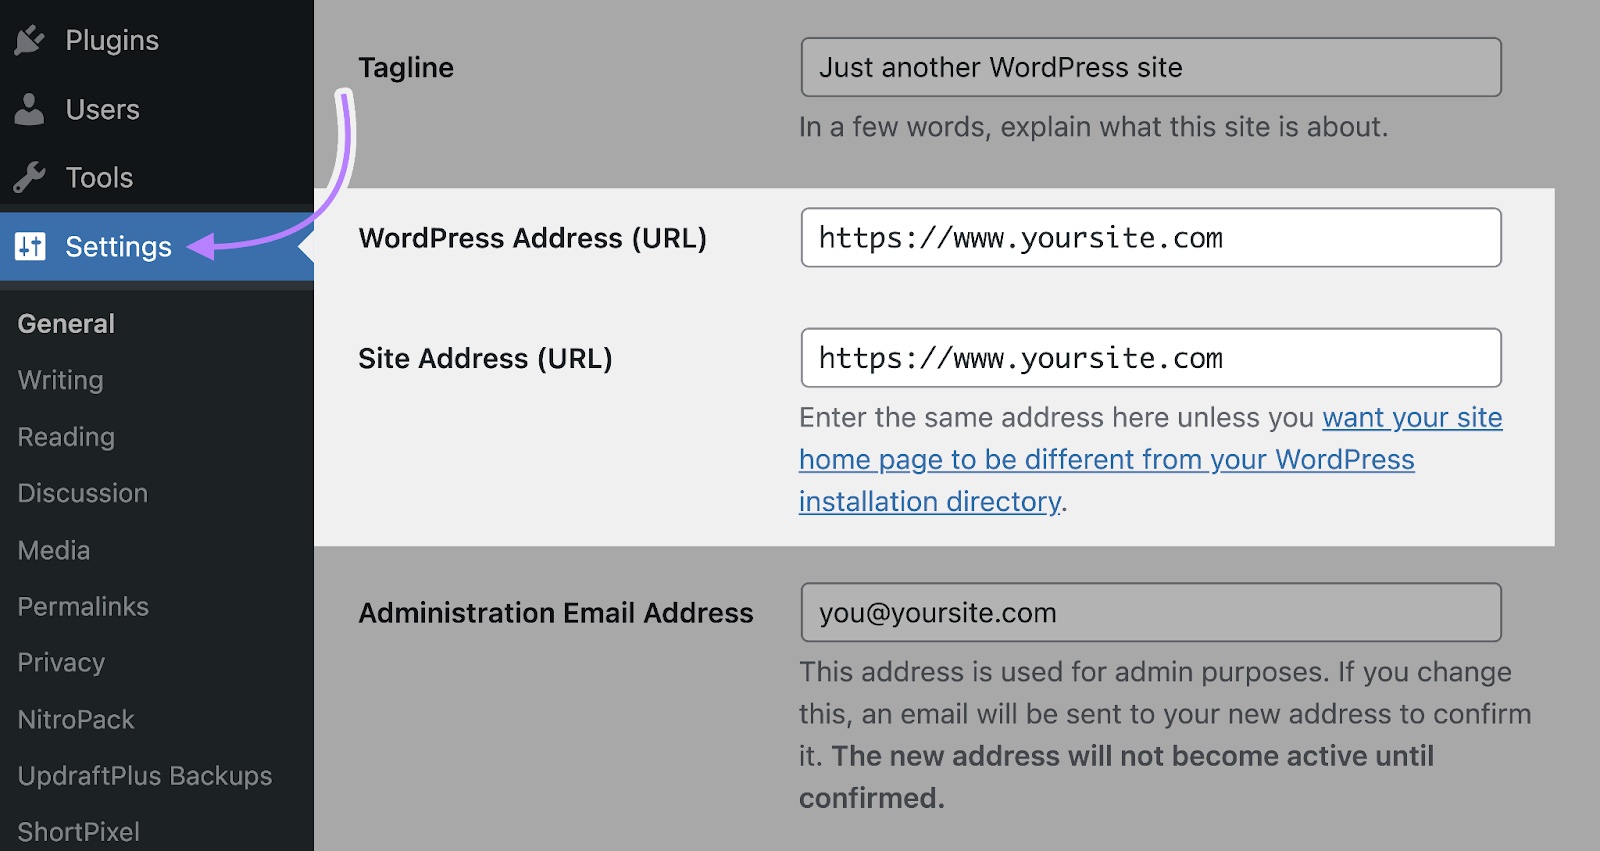
For example:
- If one uses http:// and the other uses https://, it can create a loop
- If one includes “www” and the other doesn’t, that mismatch can also trigger the error
Update both fields to match.
If you're using a different platform, check their help documentation for how to update your site's main URL.
After updating these settings, save your changes.
8. Disable or Adjust Plugins and Extensions
If you're using a CMS, one of your installed plugins or extensions might be creating the conflict.
Deactivate them to find which one might be the culprit.
In WordPress, go to “Plugins” > “Installed Plugins” and select the checkbox next to each plugin.
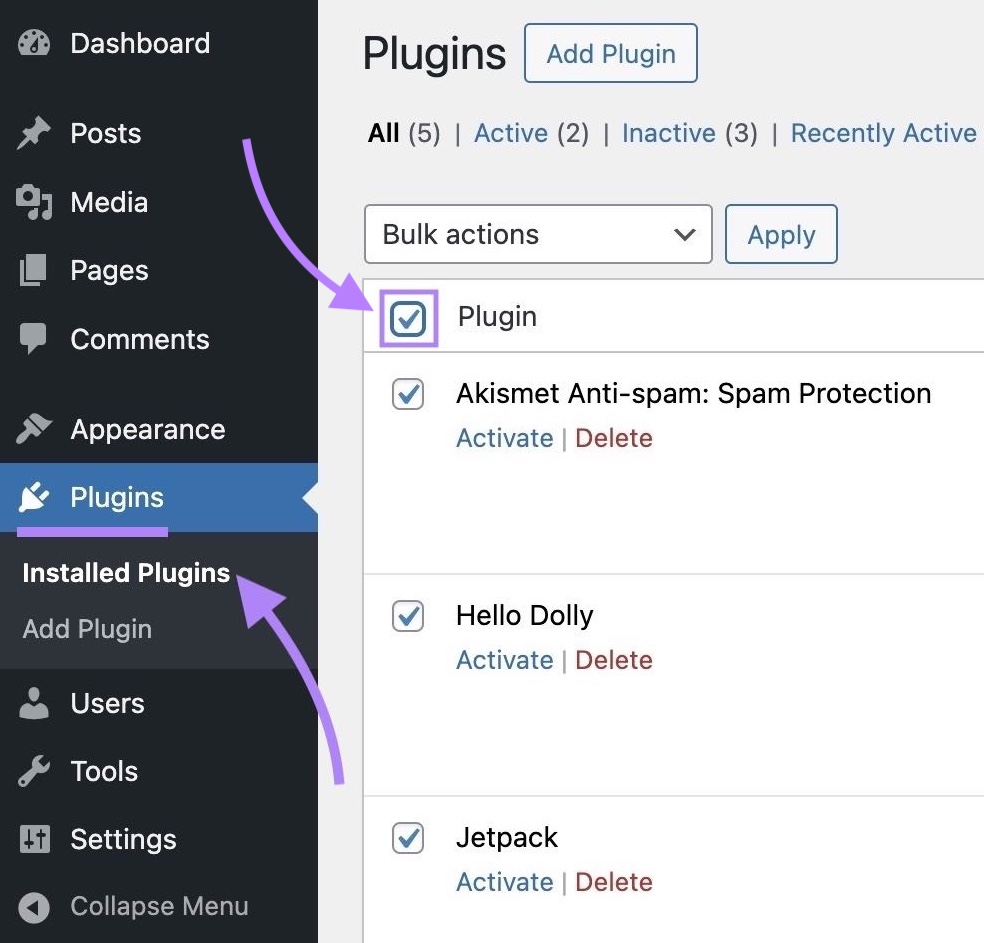
Select the “Bulk Actions” drop-down, choose "Deactivate," and click “Apply.” This will turn off all plugins.
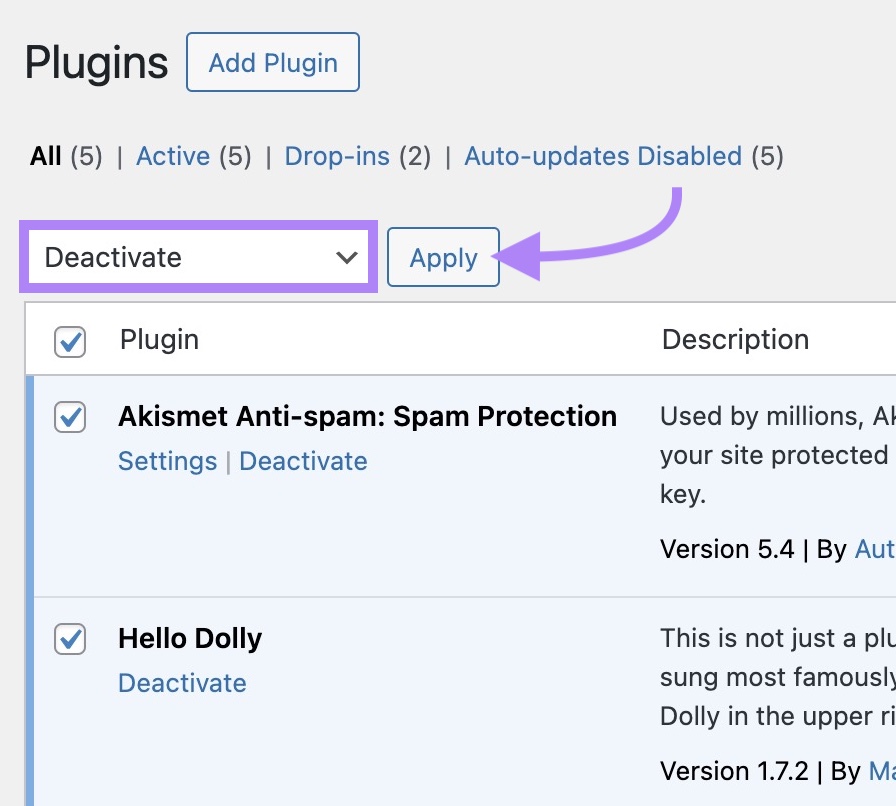
If the error disappears, one of the plugins was responsible.
Reactivate your plugins one at a time. And check your site after each one to find the one creating the loop.
You can use a similar process if you use another CMS or website platform.
Once you find the plugin causing the issue, consider switching to an alternative. And let the plugin’s developers know so they can investigate.
How to Prevent ‘Too Many Redirects’ Errors in the Future
You can prevent most redirect loops by testing changes carefully before pushing them live.
Dan recommends doing proper QA and analysis whenever you make deployments that affect URLs, redirects, cookies, or asset delivery.
Which means reviewing how URLs, redirects, cookies, and asset delivery are handled after changes to catch any unexpected behavior before it causes loops.
How?
- Check common redirect paths manually. After making updates to your site, visit key pages to check that redirects go to the correct destinations without bouncing between versions. And try multiple browsers and devices.
- Check plugins or custom scripts. Make sure these options aren’t causing redirect problems. Some tools set their own rules, which can accidentally create conflicts and lead to loops.
- Audit redirects after major site changes. Things like redesigns, migrations, or domain updates can unintentionally create redirect loops. So, run a full site audit after any major updates using Semrush’s Site Audit tool to find redirect loops.
You should also do a full technical audit of your site regularly to catch issues before they hurt your SEO rankings or organic traffic.
Run your first audit now.